51 - Lists
接下来学习List相关内容。
1、创建项目:npx create-expo-app@latest RNList,然后使用npm run reset-project重置项目代码。
2、项目根目录创建data.json文件,找到老师的代码,添加数据
3、使用map方法,来渲染list
xxxxxxxxxx411// app/index.tsx23import { Text, View, StyleSheet, ScrollView, StatusBar } from "react-native";4import PokemonList from "../data.json";56export default function Index() {7 return (8 <View style={styles.container}>9 <ScrollView style={styles.scrollView}>10 {PokemonList.map((item) => (11 <View key={item.id} style={styles.card}>12 <Text style={styles.cardText}>{item.type}</Text>13 <Text style={styles.cardText}>{item.name}</Text>14 </View>15 ))}16 </ScrollView>17 </View>18 );19}2021const styles = StyleSheet.create({22 container: {23 flex: 1,24 backgroundColor: "#f5f5f5",25 justifyContent: "center",26 paddingTop: StatusBar.currentHeight,27 },28 scrollView: {29 paddingHorizontal: 16,30 },31 card: {32 backgroundColor: "white",33 padding: 16,34 borderRadius: 8,35 borderWidth: 1,36 marginBottom: 16,37 },38 cardText: {39 fontSize: 28,40 },41});效果:
.gif)
虽然使用ScrollView和map方法,可以渲染list,但是不建议这样做,因为即使没有进入viewport的内容,也渲染了,对性能有影响。
52 - FlatList
react native里面有FlatList组件,可以值展示当前view的内容,性能很好。
FlatList 核心属性
| 属性名称 | 类型 | 描述 | 必需性 |
|---|---|---|---|
data | Array<any> | 用于创建列表项的数组数据源。 | 是 |
renderItem | ({ item, index, separators }) => React.Node | 渲染列表中每一项的函数。 | 是 |
keyExtractor | (item: any, index: number) => string | 用于从数据项中提取一个唯一的字符串作为 React 元素的 key。 | 强烈推荐 |
ListEmptyComponent | React.Node | React.ComponentType | React.Element | 当 data 数组为空时,渲染该组件作为列表的占位符。 | 否 |
ListHeaderComponent | React.Node | React.ComponentType | React.Element | 渲染在列表顶部的组件。 | 否 |
ListFooterComponent | React.Node | React.ComponentType | React.Element | 渲染在列表底部的组件。 | 否 |
ItemSeparatorComponent | React.Node | React.ComponentType | React.Element | 渲染在每一项之间的分隔符组件。 | 否 |
refreshing | boolean | 当前是否正在刷新(通常用于下拉刷新)。 | 否 |
onRefresh | () => void | 当列表被下拉以触发刷新操作时调用的函数(下拉刷新)。 | 否 |
onEndReached | ({ distanceFromEnd: number }) => void | 当列表滚动到底部附近时调用的函数(常用于加载更多)。 | 否 |
horizontal | boolean | 如果设置为 true,列表将水平而不是垂直渲染。 | 否 |
numColumns | number | 设置为大于 1 的值,可以实现多列网格布局 (Grid View)。 | 否 |
主要属性就是data和renderItem。
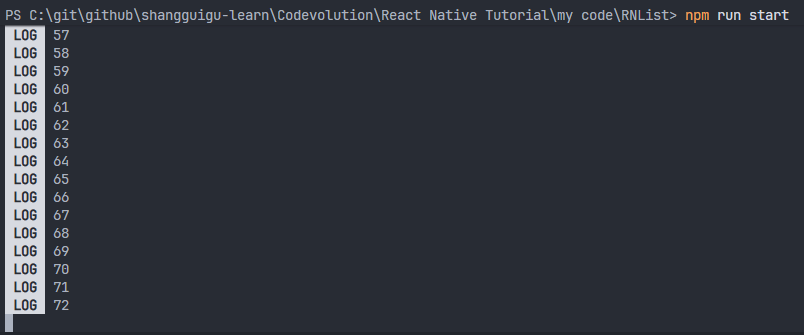
xxxxxxxxxx451// app/index.tsx23import { Text, View, StyleSheet, StatusBar, FlatList } from "react-native";4import PokemonList from "../data.json";56export default function Index() {7 return (8 <View style={styles.container}>9 <FlatList10 data={PokemonList}11 renderItem={({ item }) => {12 console.log(item.id);13 return (14 <View key={item.id} style={styles.card}>15 <Text style={styles.cardText}>{item.type}</Text>16 <Text style={styles.cardText}>{item.name}</Text>17 </View>18 );19 }}20 />21 </View>22 );23}2425const styles = StyleSheet.create({26 container: {27 flex: 1,28 backgroundColor: "#f5f5f5",29 justifyContent: "center",30 paddingTop: StatusBar.currentHeight,31 },32 scrollView: {33 paddingHorizontal: 16,34 },35 card: {36 backgroundColor: "white",37 padding: 16,38 borderRadius: 8,39 borderWidth: 1,40 marginBottom: 16,41 },42 cardText: {43 fontSize: 28,44 },45});虽然说理想情况是只渲染view页面的items,但是FlatList会预先渲染一些items,以达到性能优化的目的。所以刚开始的console.log(item.id)出现的数字是72,而不是7。
keyExtractor属性
强烈建议加上这个属性,对性能优化很有帮助。
xxxxxxxxxx131<FlatList2 data={PokemonList}3 renderItem={({ item }) => {4 console.log(item.id);5 return (6 <View key={item.id} style={styles.card}>7 <Text style={styles.cardText}>{item.type}</Text>8 <Text style={styles.cardText}>{item.name}</Text>9 </View>10 );11 }}12 keyExtractor={(item, index) => item.id.toString()}13 />53 - Item Separator
这节课学习FlatList的ItemSeparatorComponent属性。作用:渲染在每一项之间的分隔符组件。

效果:
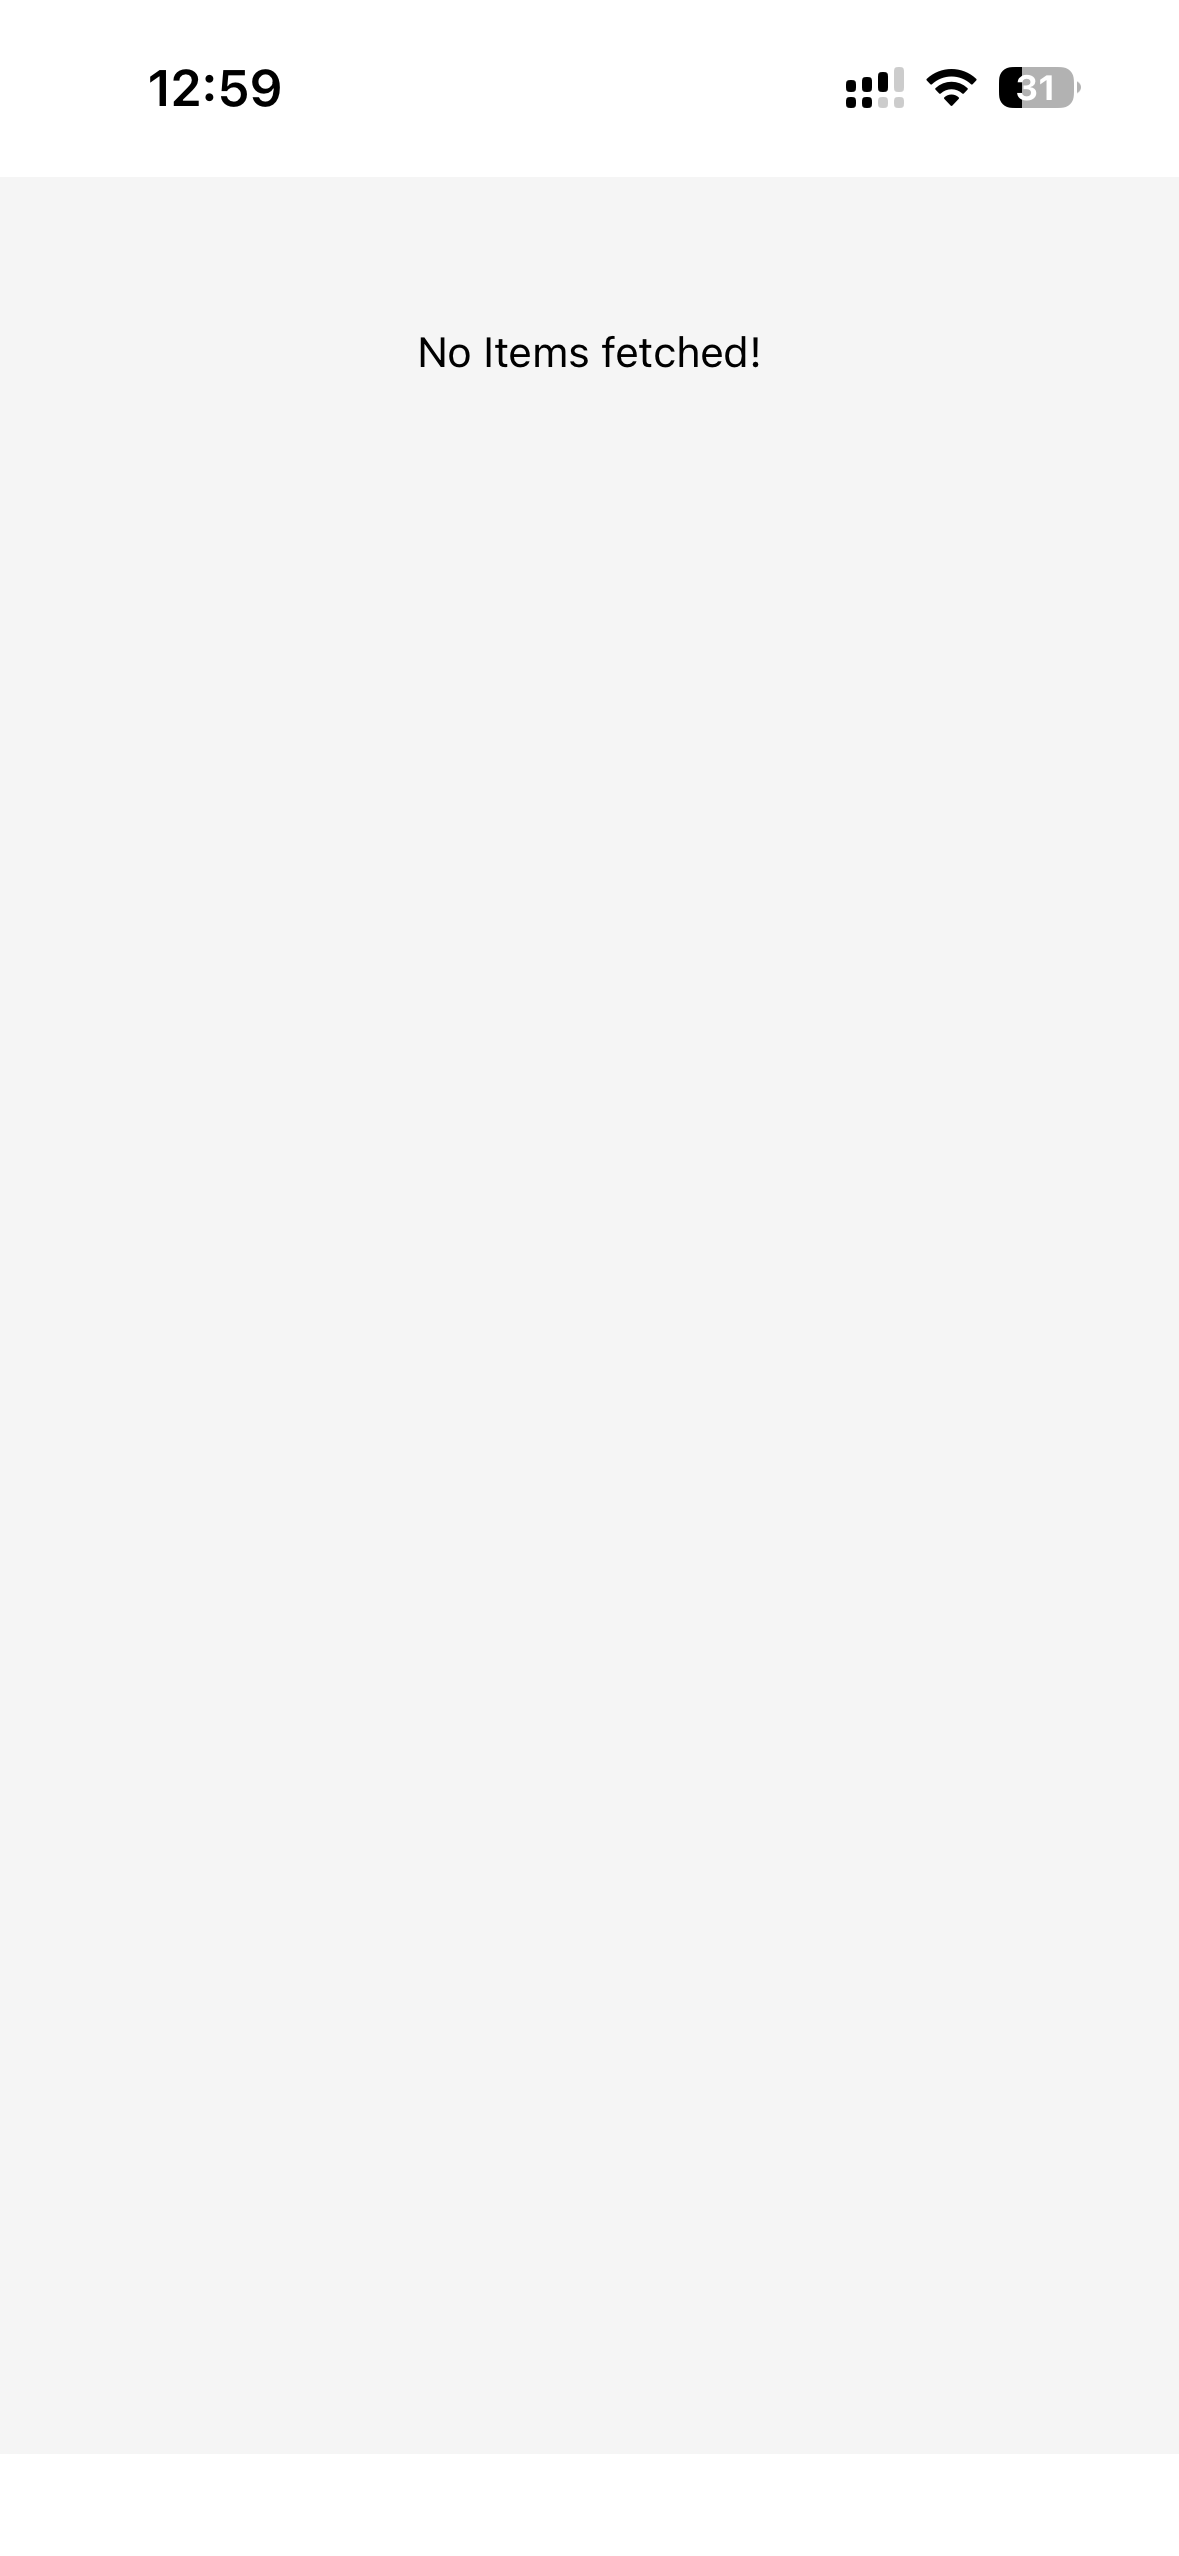
54 - List Empty
这节课来学习FlatList的ListEmptyComponent属性。
作用:当 data 数组为空时,渲染该组件作为列表的占位符。
xxxxxxxxxx201<FlatList2 style={styles.scrollView}3 data={[]}4 renderItem={({ item }) => {5 console.log(item.id);6 return (7 <View key={item.id} style={styles.card}>8 <Text style={styles.cardText}>{item.type}</Text>9 <Text style={styles.cardText}>{item.name}</Text>10 </View>11 );12 }}13 keyExtractor={(item, index) => item.id.toString()}14 ItemSeparatorComponent={() => <View style={{ height: 16, backgroundColor: "lightblue" }} />}15 ListEmptyComponent={16 <View style={styles.empty}>17 <Text>No Items fetched!</Text>18 </View>19 }20 />效果:
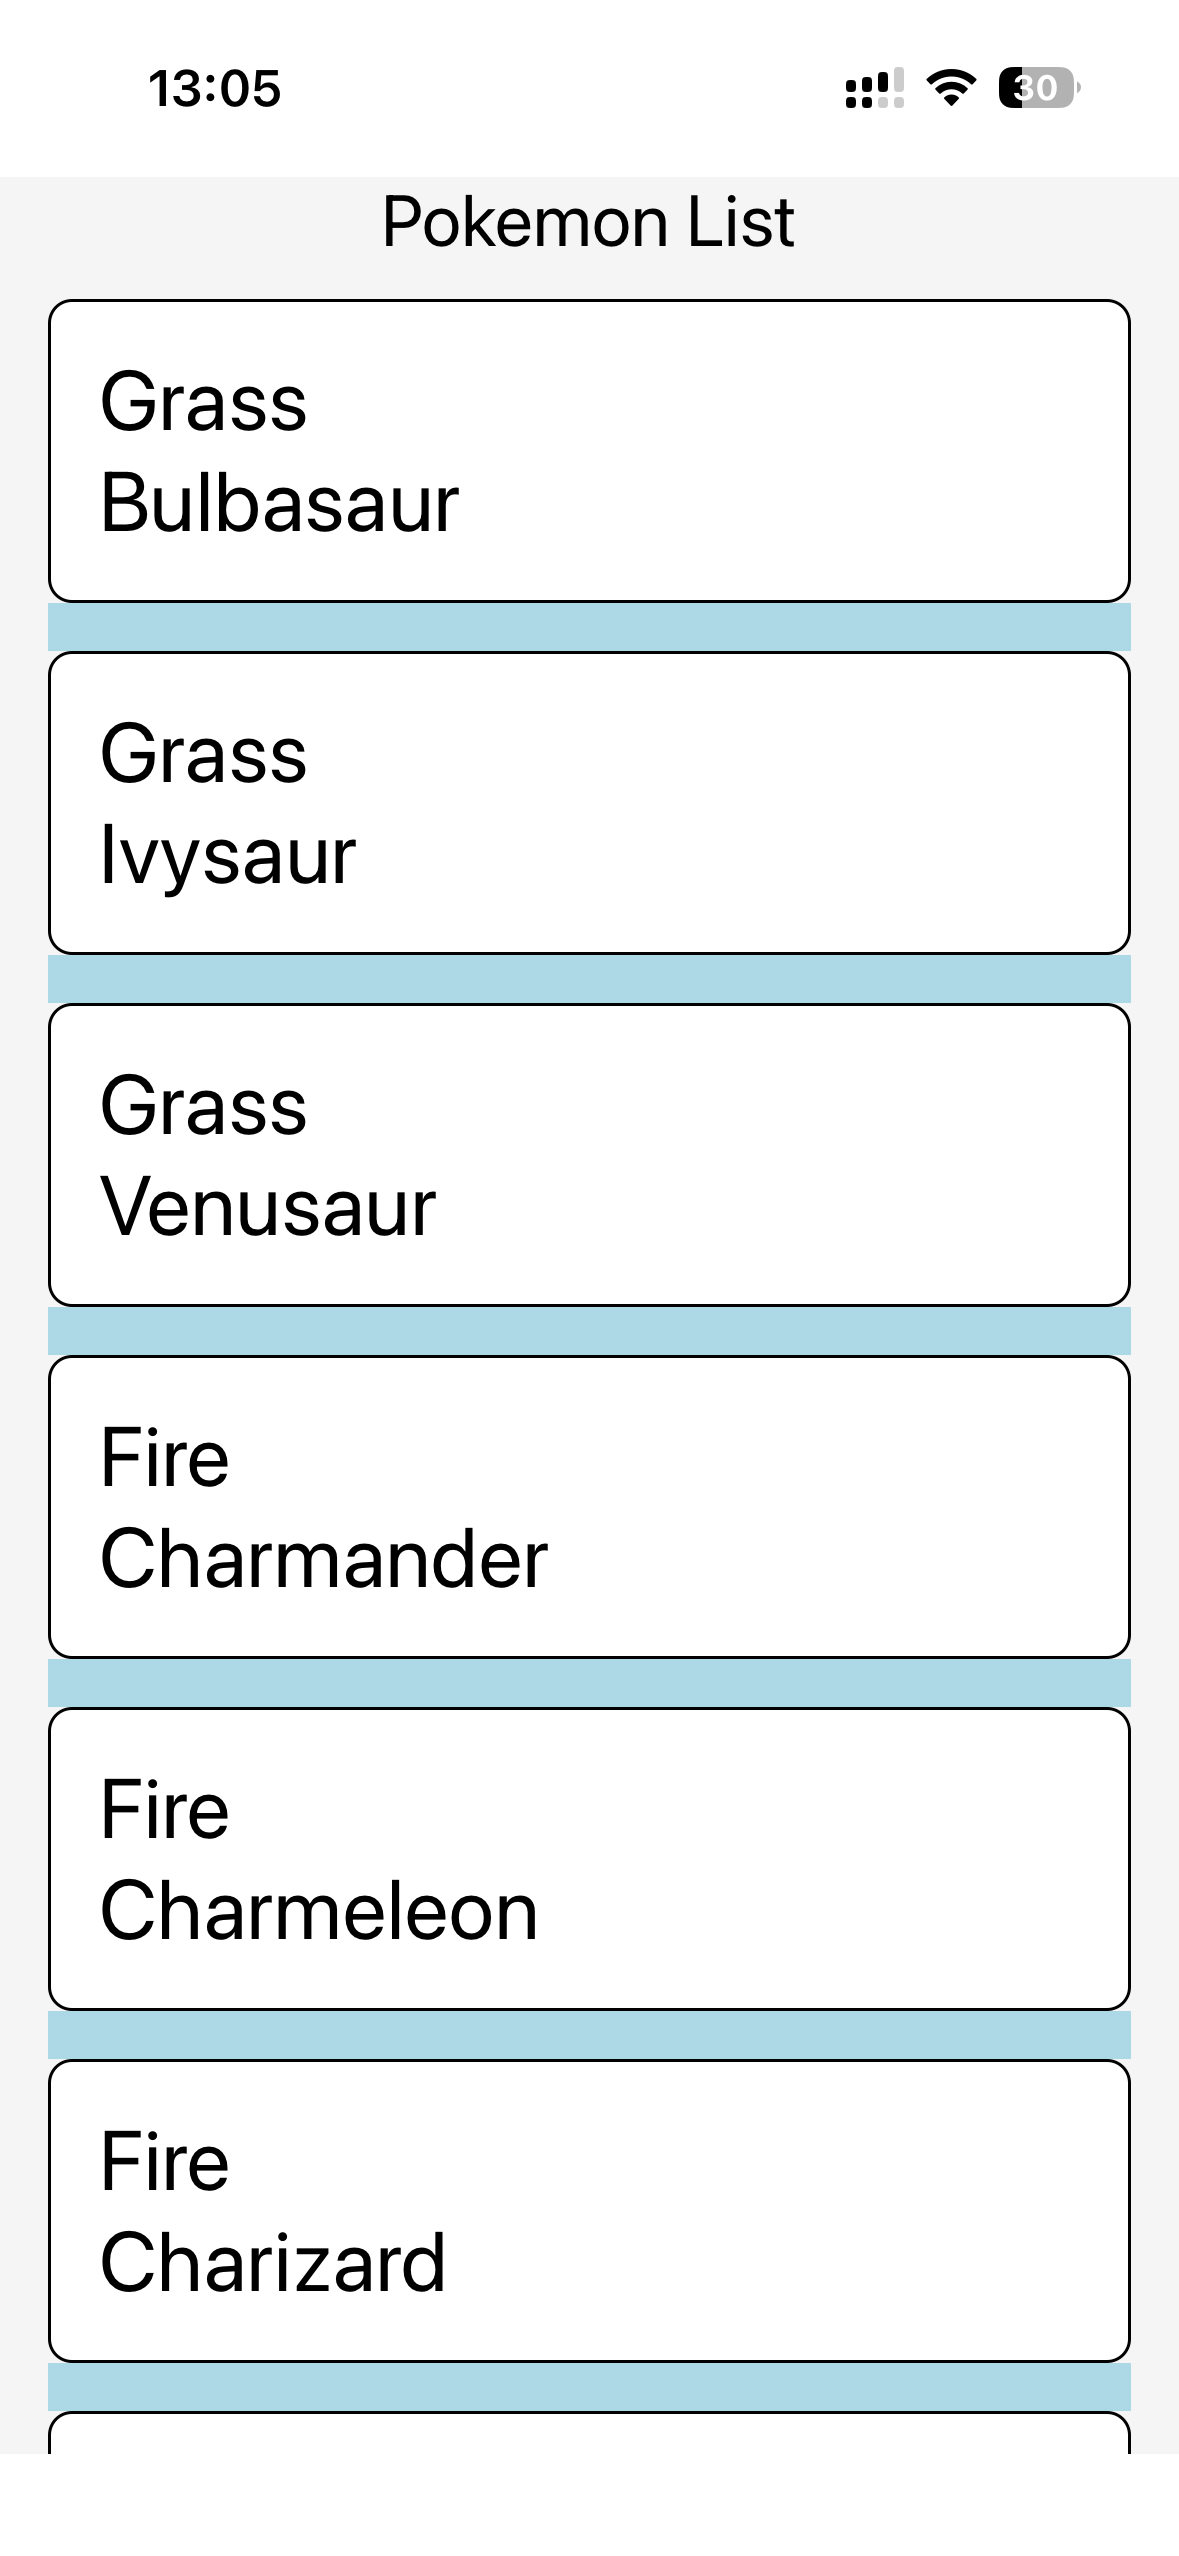
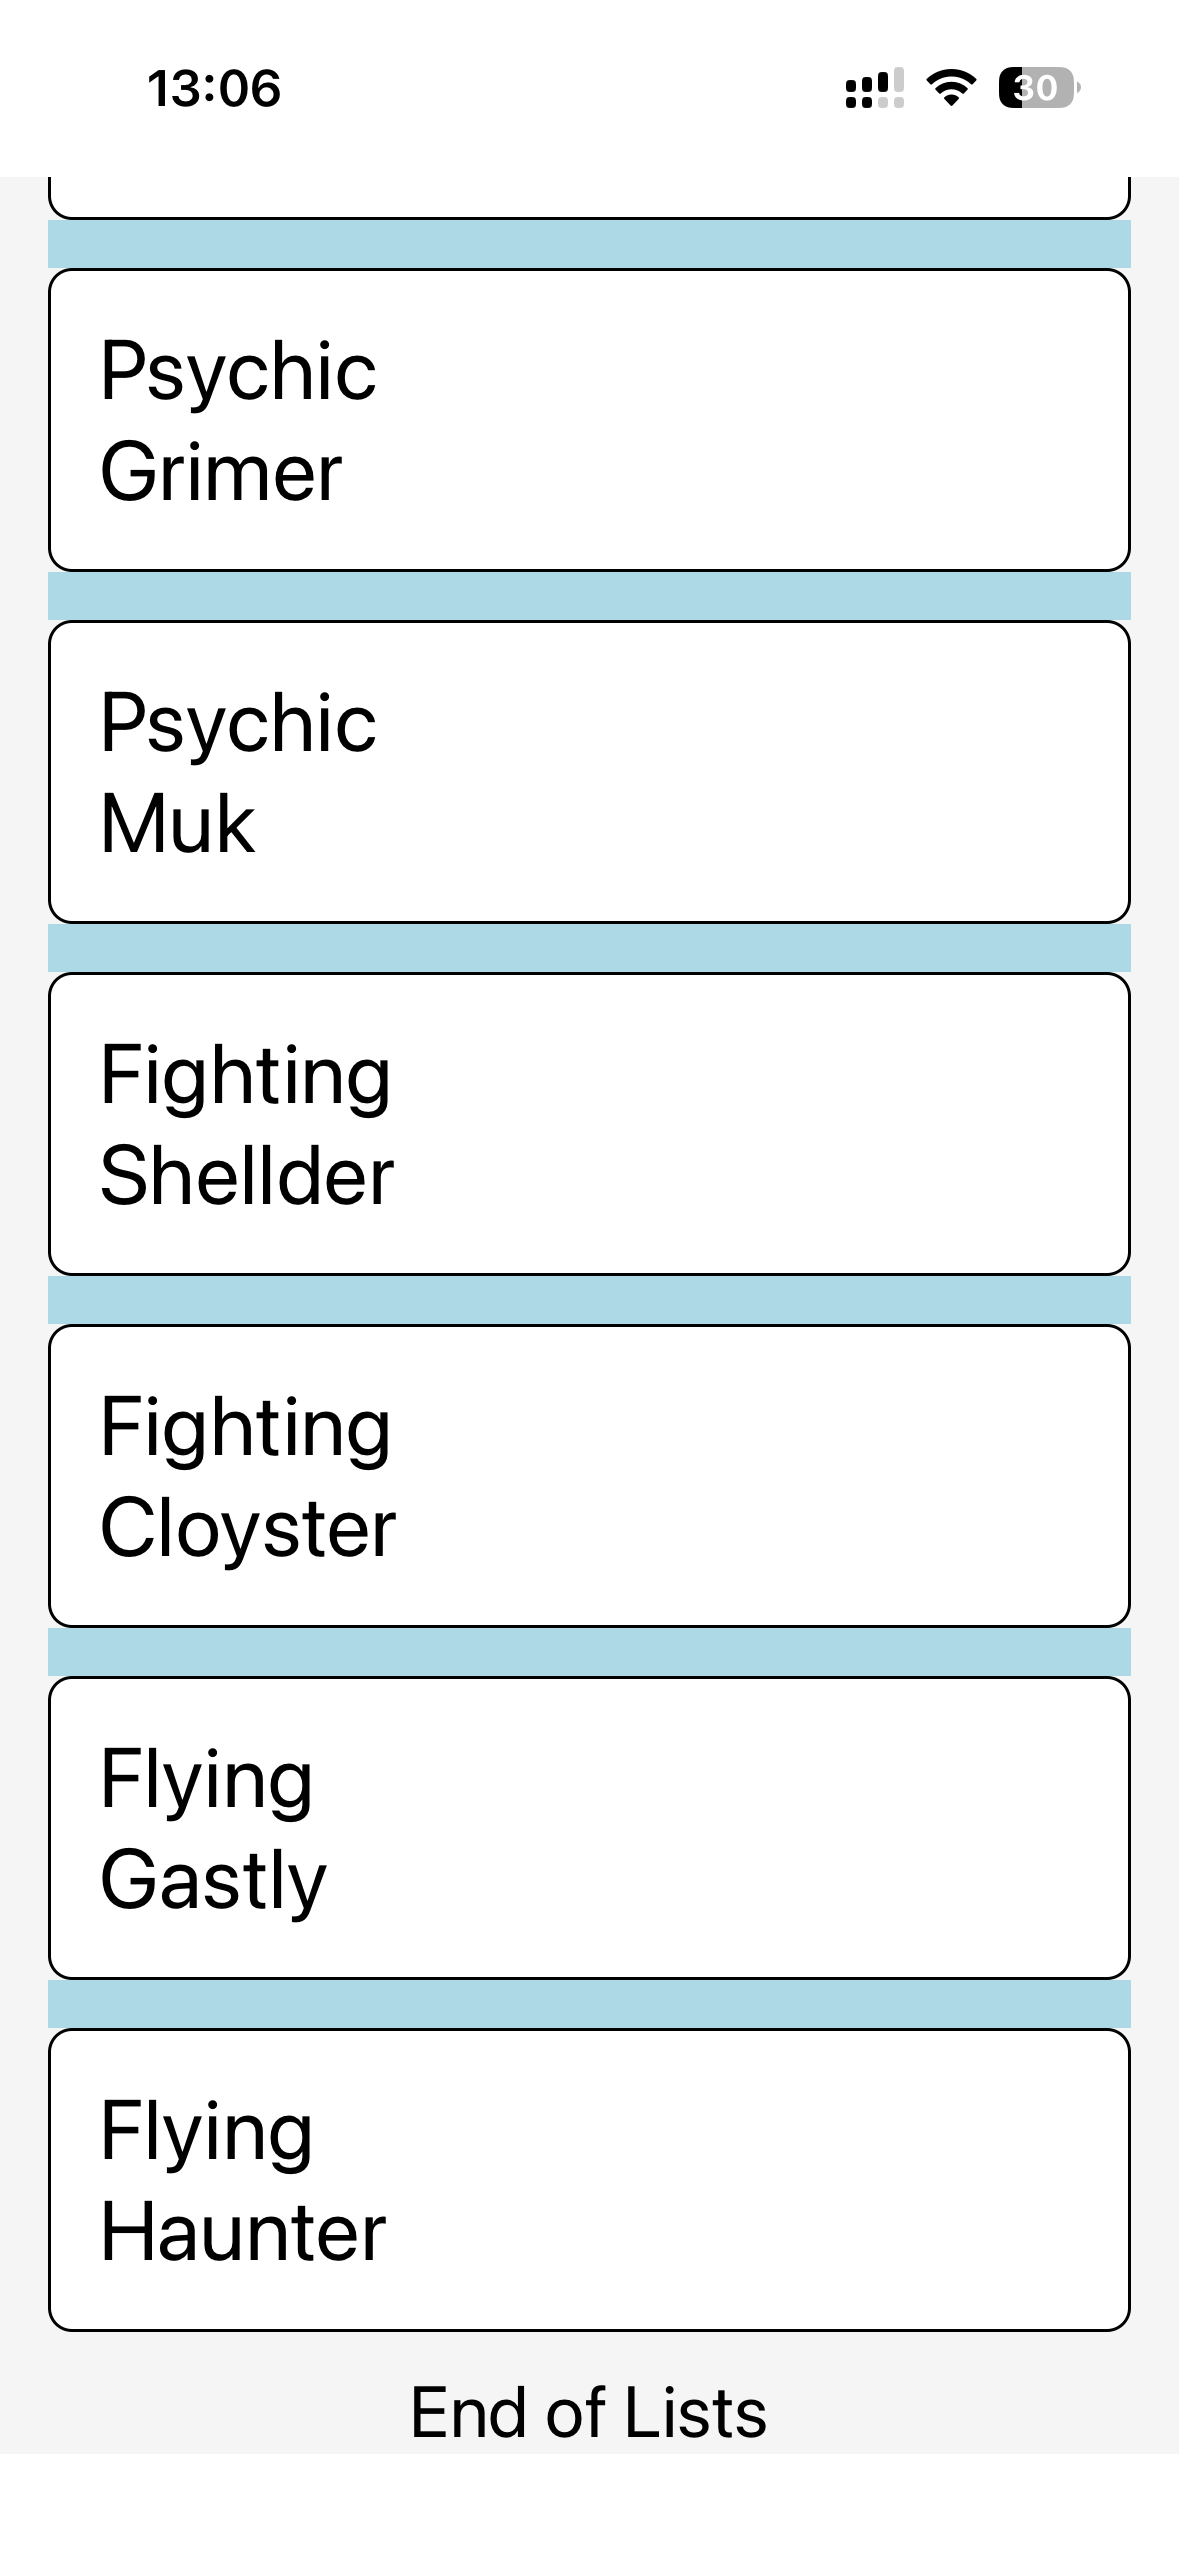
55 - List Header and Footer
这节课来学习FlatList的ListHeaderComponent和ListFooterComponent属性。分别表示渲染在列表顶部的组件和渲染在列表底部的组件。
xxxxxxxxxx231<FlatList2 style={styles.scrollView}3 data={PokemonList}4 renderItem={({ item }) => {5 console.log(item.id);6 return (7 <View key={item.id} style={styles.card}>8 <Text style={styles.cardText}>{item.type}</Text>9 <Text style={styles.cardText}>{item.name}</Text>10 </View>11 );12 }}13 keyExtractor={(item, index) => item.id.toString()}14 ItemSeparatorComponent={() => <View style={{ height: 16, backgroundColor: "lightblue" }} />}15 ListEmptyComponent={16 <View style={styles.empty}>17 <Text>No Items fetched!</Text>18 </View>19 }20 21 ListHeaderComponent={<Text style={styles.headerText}>Pokemon List</Text>}22 ListFooterComponent={<Text style={styles.footerText}>End of Lists</Text>}23 />效果:
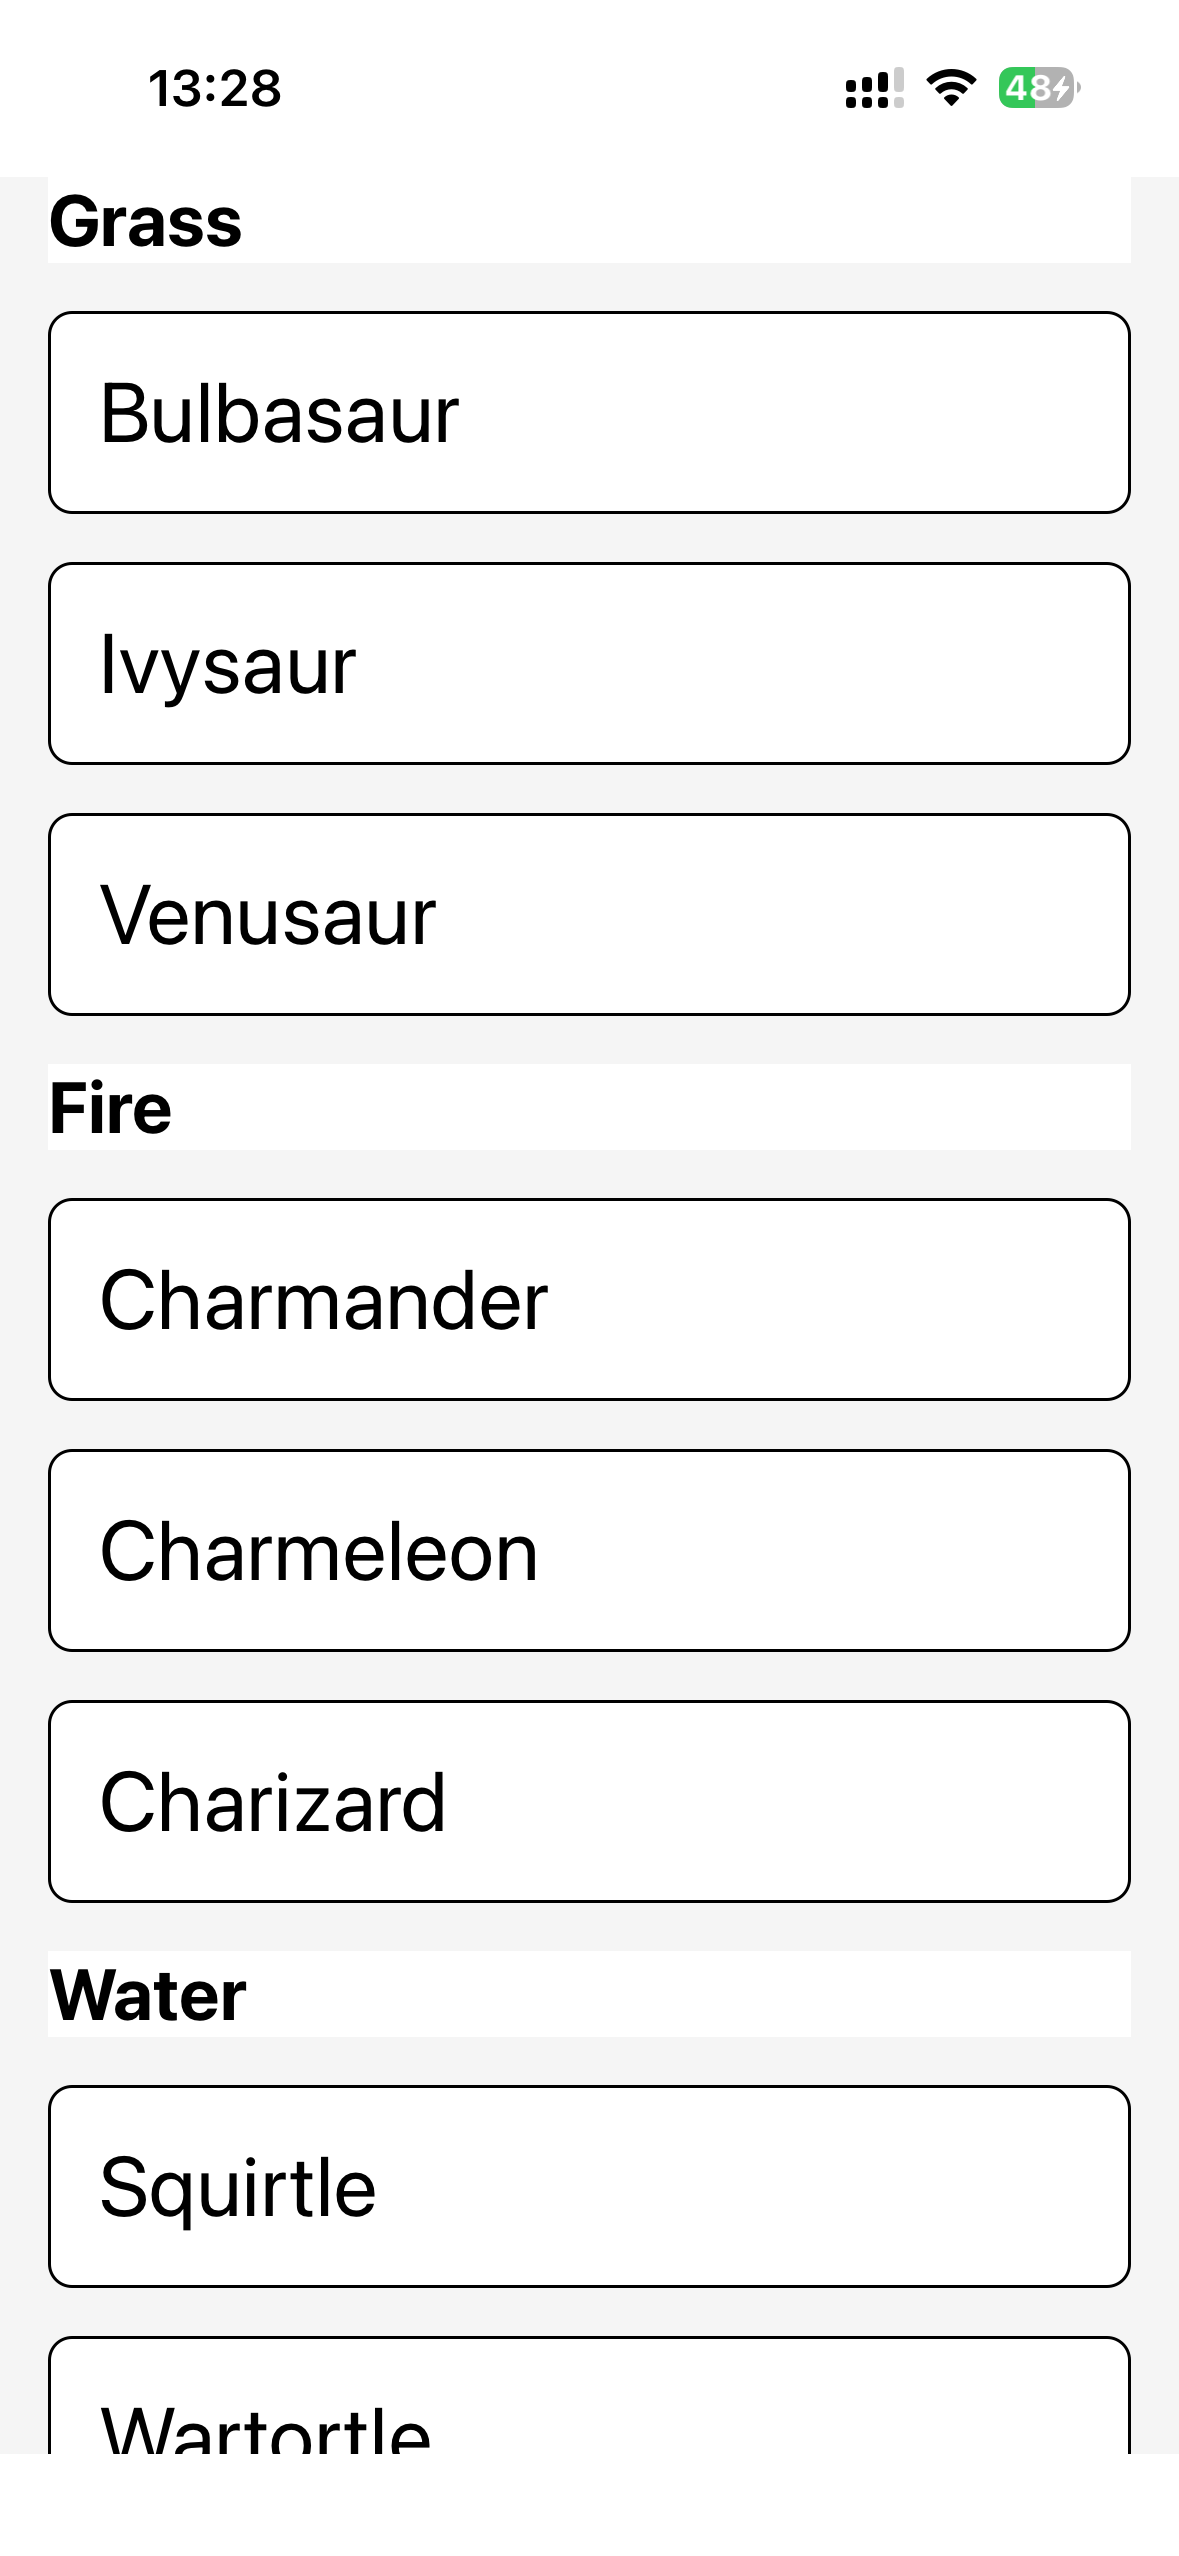
56 - SectionList
SectionList 是 React Native 中另一个用于渲染长列表的高性能组件,它是基于 FlatList 构建的。SectionList 专门用于渲染带分组(Sectioned)的数据列表,这意味着数据会被分成不同的部分,并且每个部分通常都会有一个固定的头部标题(Header)。
适用场景:
- 通讯录/联系人列表: 按字母表(A, B, C...)分组。
- 设置页面: 按功能类别(通用、通知、隐私)分组。
- 餐饮菜单: 按类别(开胃菜、主菜、甜点)分组。
SectionList关键属性:
| 属性名称 | 类型 | 描述 | 必需性 |
|---|---|---|---|
sections | Array<Section> | 结构化的数据数组,用于生成分组列表。 | 是 |
renderItem | ({ item, section, index }) => React.Node | 渲染分组内每一项的函数。 | 是 |
renderSectionHeader | ({ section: Section }) => React.Node | 渲染每个分组头部标题的函数。 | 是 |
renderSectionFooter | ({ section: Section }) => React.Node | 渲染每个分组底部的组件。 | 否 |
ItemSeparatorComponent | React.Node | Component | 渲染同一分组内列表项之间的分隔符。 | 否 |
SectionSeparatorComponent | React.Node | Component | 渲染分组之间(Section Header/Footer 之间)的分隔符。 | 否 |
stickySectionHeadersEnabled | boolean | 如果设置为 true,分组头部会停留在屏幕顶部(粘性头部),直到下一个头部滚动到位。 | 否 |
用案例说明:
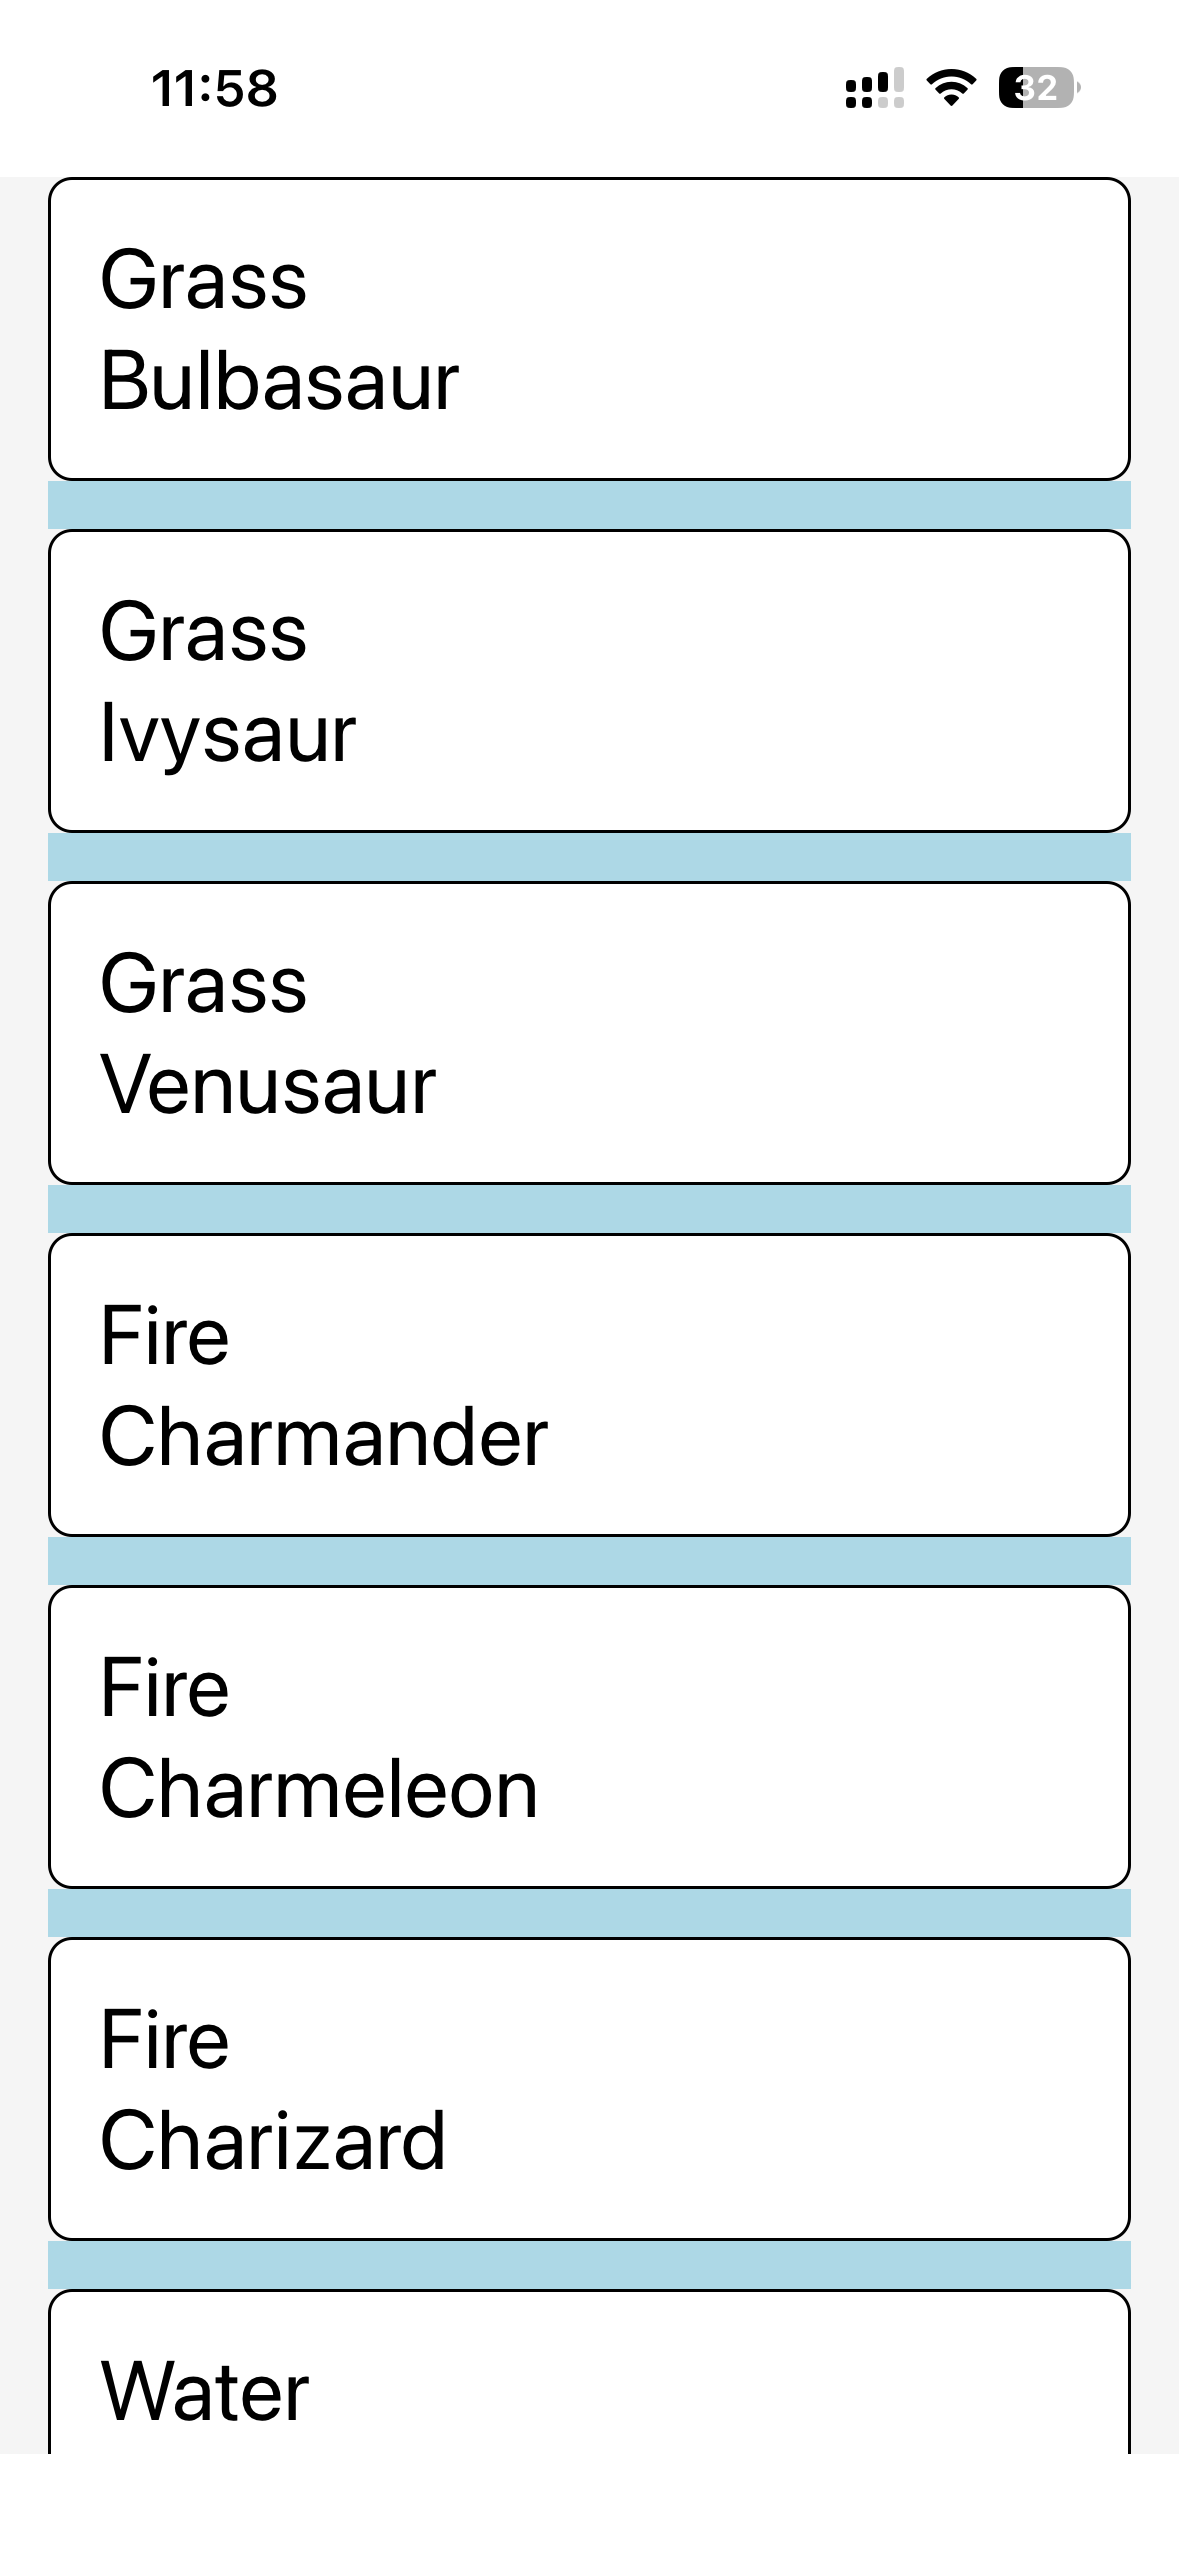
1、创建数据文件grouped-data.json
xxxxxxxxxx151[2 {3 "type": "Grass",4 "data": ["Bulbasaur", "Ivysaur", "Venusaur"]5 },6 {7 "type": "Fire",8 "data": ["Charmander", "Charmeleon", "Charizard"]9 },10 {11 "type": "Water",12 "data": ["Squirtle", "Wartortle", "Blastoise"]13 },14 { "type": "Electric", "data": ["Pikachu", "Raichu"] }15]2、编写组件
xxxxxxxxxx731// app/index.tsx23import { Text, View, StyleSheet, ScrollView, StatusBar, FlatList, SectionList } from "react-native";4import PokemonList from "../data.json";5import groupedPokemonList from "../grouped-data.json";67export default function Index() {8 return (9 <View style={styles.container}>10 <View style={styles.scrollView}>11 12 <SectionList13 sections={groupedPokemonList}14 renderItem={({ item }) => {15 return (16 <View style={styles.card}>17 <Text style={styles.cardText}>{item}</Text>18 </View>19 );20 }}21 renderSectionHeader={({ section }) => {22 return <Text style={styles.sectionHeaderText}>{section.type}</Text>;23 }}24 ItemSeparatorComponent={() => <View style={{ height: 16 }} />}25 SectionSeparatorComponent={() => <View style={{ height: 16 }} />}26 />27 28 </View>29 </View>30 );31}3233const styles = StyleSheet.create({34 container: {35 flex: 1,36 backgroundColor: "#f5f5f5",37 justifyContent: "center",38 paddingTop: StatusBar.currentHeight,39 },40 scrollView: {41 paddingHorizontal: 16,42 },43 card: {44 backgroundColor: "white",45 padding: 16,46 borderRadius: 8,47 borderWidth: 1,48 // marginBottom: 16,49 },50 cardText: {51 fontSize: 28,52 },53 empty: {54 flex: 1,55 paddingTop: 50,56 alignItems: "center",57 },58 headerText: {59 fontSize: 24,60 textAlign: "center",61 marginBottom: 12,62 },63 footerText: {64 fontSize: 24,65 textAlign: "center",66 marginTop: 12,67 },68 sectionHeaderText: {69 backgroundColor: "white",70 fontSize: 24,71 fontWeight: "bold",72 },73});效果:
57 - Inputs and Forms
web开发中,HTML提供了很多原生的元素来捕获用户输入。但是RN核心库只提供了TextInput和Switch两个元素。
那其余组件怎么办?expo提供了一些。如果还需要别的组件,使用第三方组件库就可以。
关于RN里面的forms,我们主要学习四方面的内容。
创建项目:npx create-expo-app@latest RNForms,然后使用npm run reset-project重置项目代码。
58 - TextInput
这节课学习TextInput组件。TextInput 是 React Native 中处理文本输入最核心、也是最重要的组件。它允许用户输入文本,是构建几乎所有表单(如登录、注册、搜索)的基础。
核心属性:
| 属性名称 | 类型 | 描述 | 主要用途 |
|---|---|---|---|
value | string | 当前输入框中显示的文本值。通常绑定到组件的 state。 | 控制组件的关键 |
onChangeText | (text: string) => void | 当文本发生变化时调用的回调函数。用于将输入同步到 state。 | 数据绑定的关键 |
placeholder | string | 当输入为空时显示的占位符文本。 | 提示用户输入内容 |
placeholderTextColor | Color | 占位符文本的颜色。 | 美化 UI |
editable | boolean | 如果设置为 false,文本输入框将不可编辑。 | 禁用输入 |
multiline | boolean | 如果设置为 true,输入框可以输入多行文本。 | 大段文本输入(如留言) |
maxLength | number | 限制输入的最大字符数。 | 限制输入长度 |
autoCorrect | boolean | 如果设置为 false,则禁用设备提供的自动修正和自动建议。 | 输入专有名词、代码或不需要修正的内容时(如用户名) |
autoFocus | boolean | 如果设置为 true,组件挂载后会自动聚焦。 | 页面加载后立即输入 |
案例:
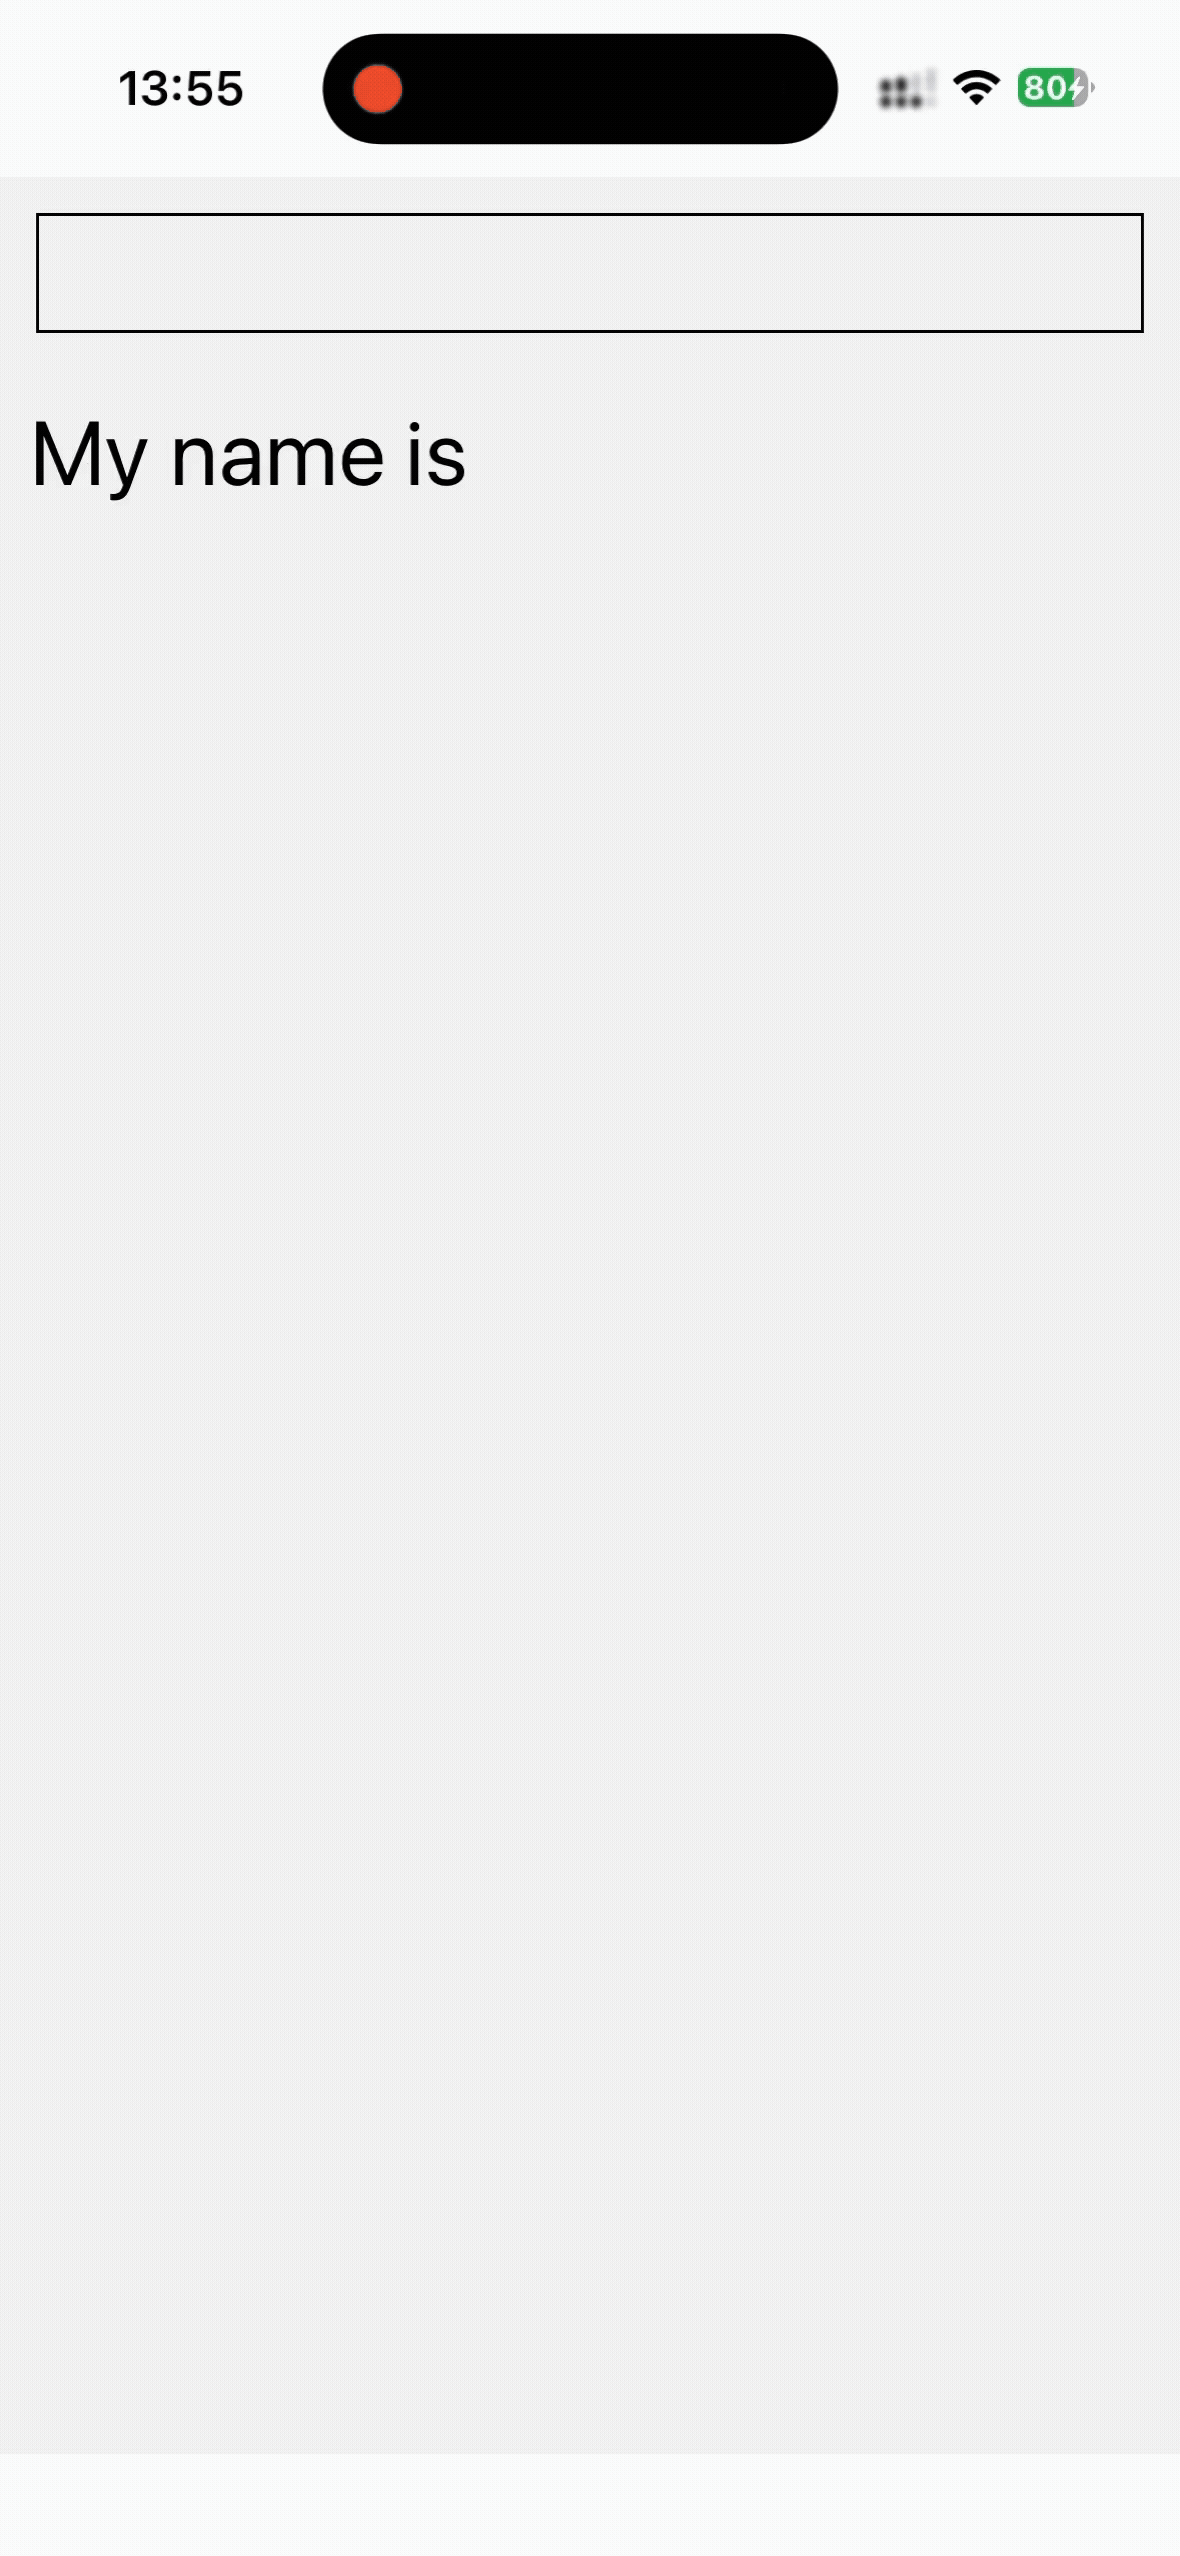
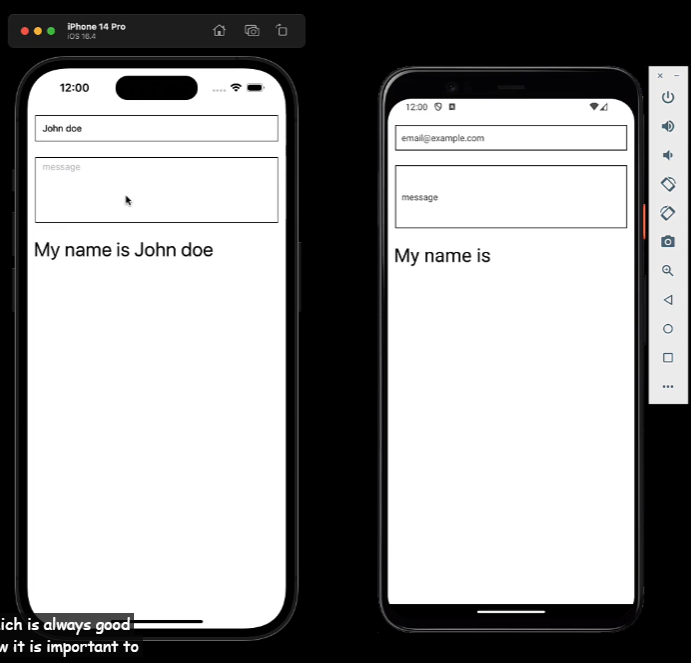
xxxxxxxxxx321// app/index.tsx23import { useState } from "react";4import { View, StyleSheet, StatusBar, TextInput, Text } from "react-native";56export default function Index() {7 const [name, setName] = useState("");8 return (9 <View style={styles.container}>10 <TextInput style={styles.input} value={name} onChangeText={setName} />11 <Text style={styles.name}>My name is {name}</Text>12 </View>13 );14}1516const styles = StyleSheet.create({17 container: {18 flex: 1,19 backgroundColor: "#f5f5f5",20 paddingTop: StatusBar.currentHeight,21 },22 input: {23 height: 40,24 margin: 12,25 padding: 10,26 borderWidth: 1,27 },28 name: {29 fontSize: 30,30 padding: 10,31 },32});效果:
59 - TextInput Props
这节课演示了一下这些属性:placeholder、secureTextEntry、keyboardType、autoCorrect、autoCapitalize。自己试一下即可。
键盘配置属性:
| 属性名称 | 类型 | 描述 | 适用场景 |
|---|---|---|---|
keyboardType | enum | 设置虚拟键盘的类型,以匹配预期的输入数据。 | numeric (数字), email-address (邮箱), phone-pad (电话号码), default (默认) |
secureTextEntry | boolean | 如果设置为 true,输入的内容将被隐藏(用于密码输入)。 | 密码输入框 |
autoCapitalize | enum | 控制输入文本的自动大写行为。 | none, sentences, words, characters |
returnKeyType | enum | 设置键盘右下角“返回”键的样式和文本。 | done, go, next, send |
onSubmitEditing | (event) => void | 当用户按下键盘上的“返回”/“完成”键时调用的函数。 | 提交表单或跳转到下一个输入框 |
60 - Multiline TextInput
设置TextInput的multiline属性为true,即可将其变为多行输入框。
xxxxxxxxxx421// app/index.tsx23import { useState } from "react";4import { View, StyleSheet, StatusBar, TextInput, Text } from "react-native";56export default function Index() {7 const [name, setName] = useState("");8 return (9 <View style={styles.container}>10 <TextInput11 style={styles.input}12 value={name}13 onChangeText={setName}14 placeholder="enter your name"15 />16 <TextInput style={[styles.input, styles.multilineText]} multiline placeholder="message" />17 <Text style={styles.name}>My name is {name}</Text>18 </View>19 );20}2122const styles = StyleSheet.create({23 container: {24 flex: 1,25 backgroundColor: "#f5f5f5",26 paddingTop: StatusBar.currentHeight,27 },28 input: {29 height: 40,30 margin: 12,31 padding: 10,32 borderWidth: 1,33 },34 name: {35 fontSize: 30,36 padding: 10,37 },38 multilineText: {39 minHeight: 100,40 verticalAlign: "top",41 },42});效果:
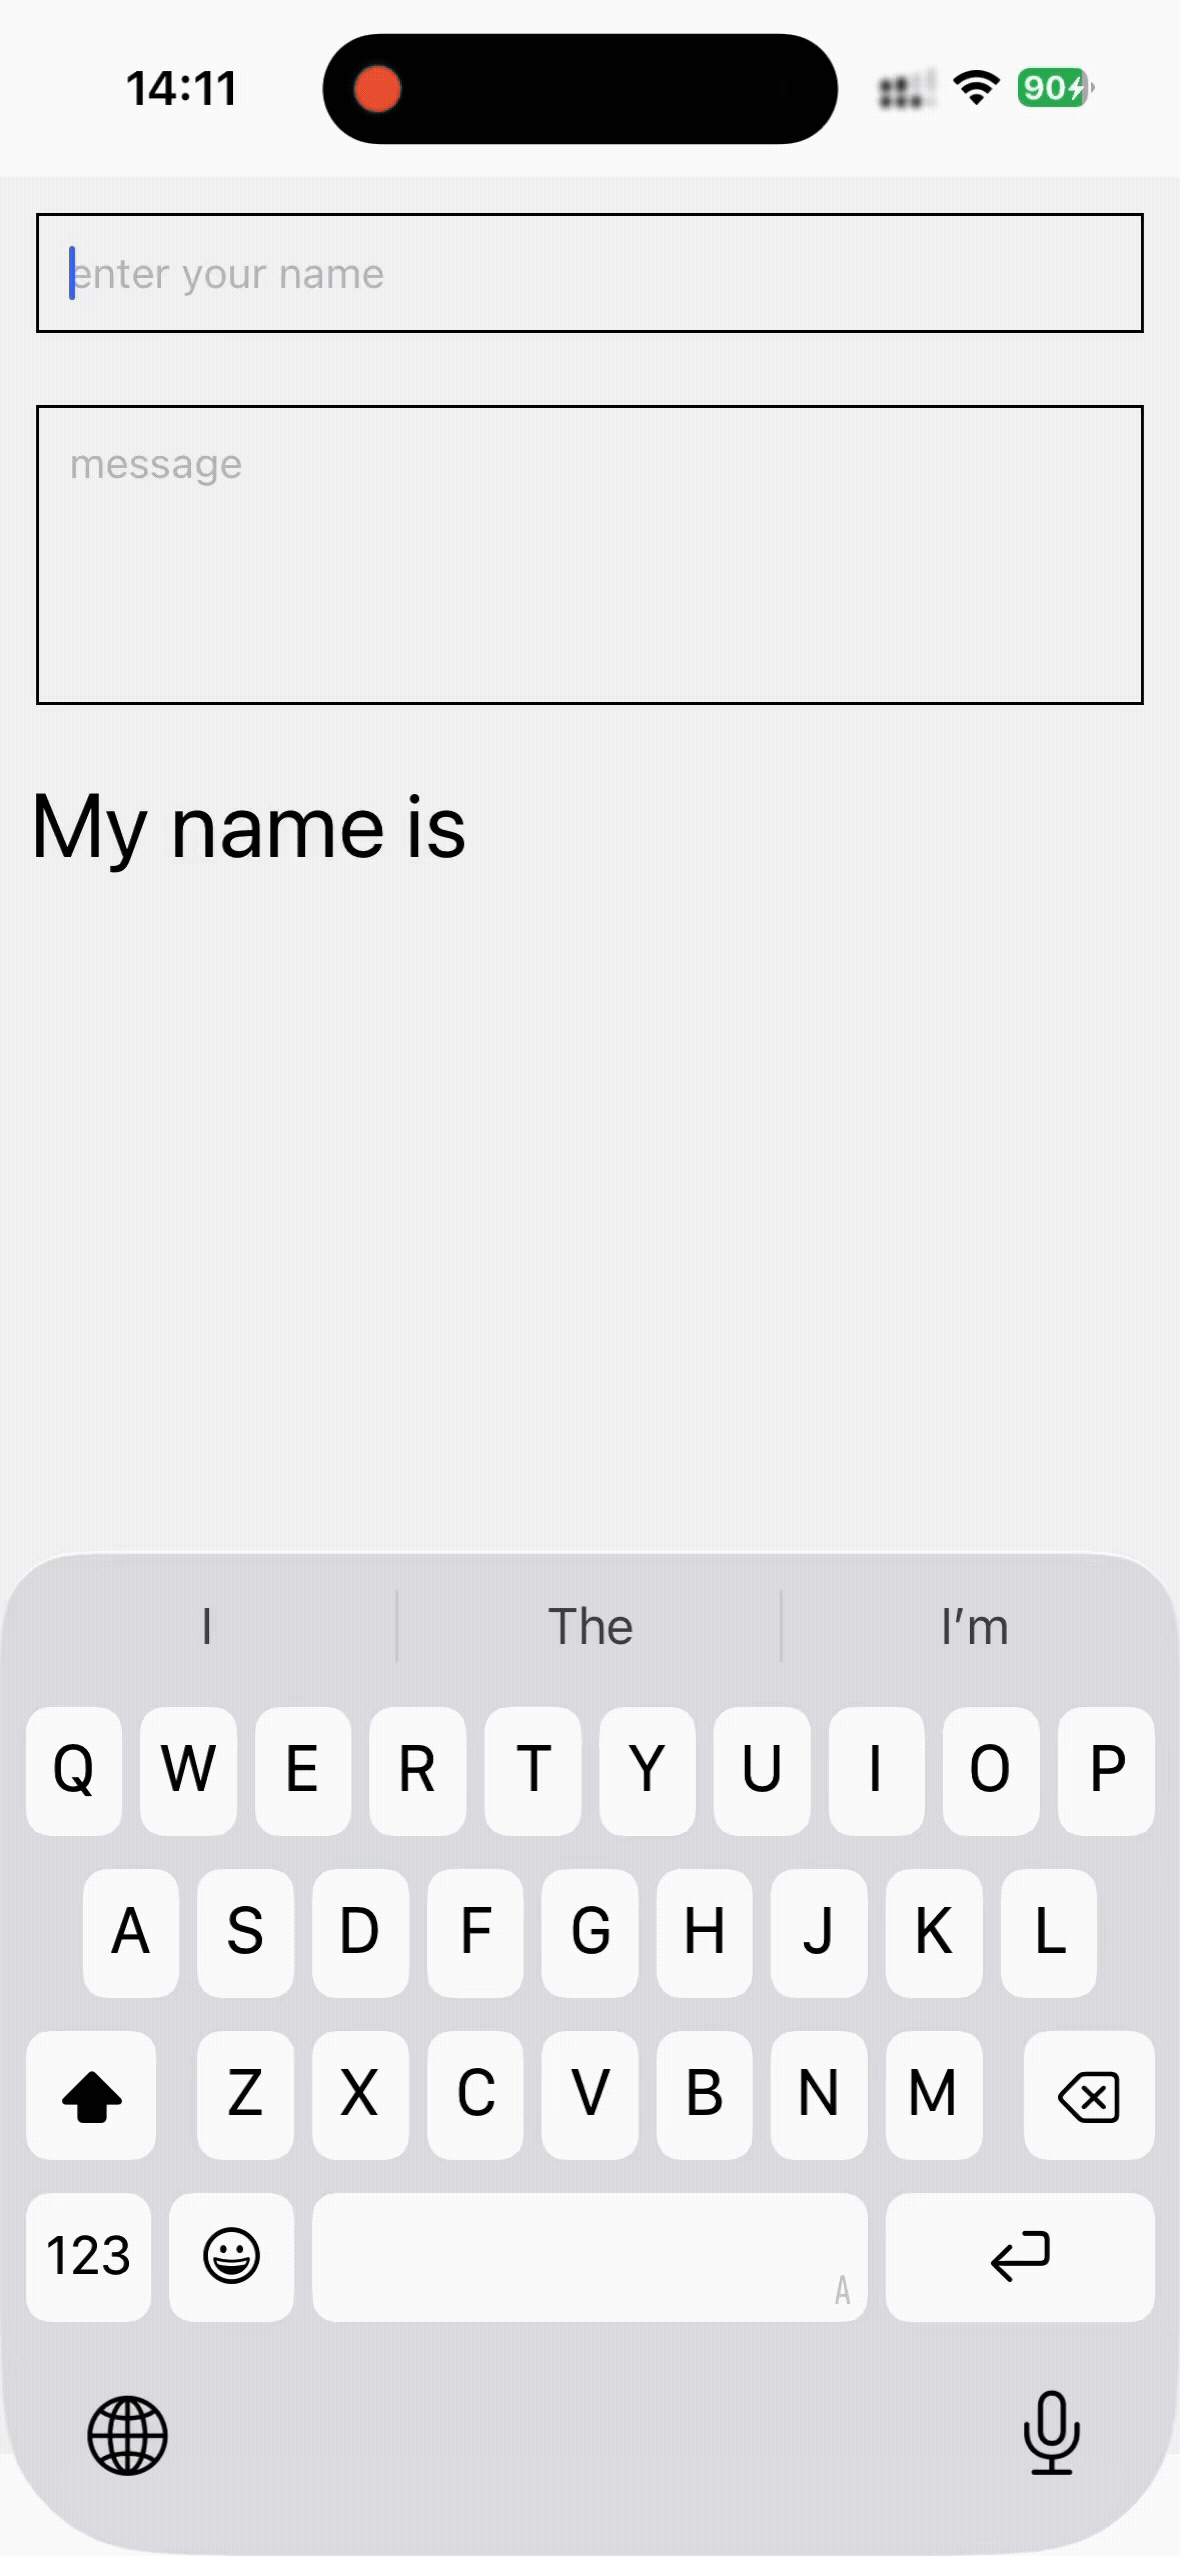
需要注意的是,在ios中,多行输入框中的文字位置是left-top;而在android中,则是left-center。为了解决这个问题,需要在多行输入框中设置样式textAlignVertical: "top"。
61 - Switch
Switch 组件是 React Native 中的另一个核心表单组件,它用于渲染一个布尔值输入,通常以可切换的滑块形式出现,代表“开/关”或“是/否”的状态。
Switch 是一个受控组件 (Controlled Component),这意味着您需要使用组件的 state 来管理它的当前状态 (value),并使用 onValueChange 来响应用户的切换操作。
核心属性(Core Props)
| 属性名称 | 类型 | 描述 | 必需性 |
|---|---|---|---|
value | boolean | 开关的当前状态。true 为开,false 为关。 | 是 (作为受控组件) |
onValueChange | (value: boolean) => void | 当用户切换开关时调用的回调函数。回调参数是新的状态值。 | 是 (用于响应用户输入) |
disabled | boolean | 如果设置为 true,开关将变灰且不可操作。 | 否 |
样式配置属性 (Color Props)
| 属性名称 | 类型 | 描述 | 平台差异 |
|---|---|---|---|
trackColor | { false?: Color, true?: Color } | 设置开关轨道 (Track) 的颜色。通常用于显示开/关状态的背景色。 | 跨平台,但用法稍有不同 |
thumbColor | Color | 设置开关滑块 (Thumb) 的颜色。 | Android 和 iOS 行为不同,推荐使用。 |
ios_backgroundColor | Color | 仅限 iOS。设置开关禁用时的背景颜色。 | 仅限 iOS |
案例:
xxxxxxxxxx611// app/index.tsx23import { useState } from "react";4import { View, StyleSheet, StatusBar, TextInput, Text, Switch } from "react-native";56export default function Index() {7 const [name, setName] = useState("");8 const [isDarkMode, setIsDarkMode] = useState(false);9 return (10 <View style={styles.container}>11 <TextInput12 style={styles.input}13 value={name}14 onChangeText={setName}15 placeholder="enter your name"16 />17 <TextInput style={[styles.input, styles.multilineText]} multiline placeholder="message" />18 <Text style={styles.name}>My name is {name}</Text>19 <View>20 <Text>Dark Mode</Text>21 <Switch22 value={isDarkMode}23 onValueChange={() => setIsDarkMode((prevState) => !prevState)}24 trackColor={{25 false: "767677",26 true: "lightblue",27 }}28 thumbColor="#f4f3f4"29 />30 </View>31 </View>32 );33}3435const styles = StyleSheet.create({36 container: {37 flex: 1,38 backgroundColor: "#f5f5f5",39 paddingTop: StatusBar.currentHeight,40 },41 input: {42 height: 40,43 margin: 12,44 padding: 10,45 borderWidth: 1,46 },47 name: {48 fontSize: 30,49 padding: 10,50 },51 multilineText: {52 minHeight: 100,53 textAlignVertical: "top",54 },55 switchContainer: {56 flexDirection: "row",57 alignItems: "center",58 justifyContent: "space-between",59 paddingHorizontal: 10,60 },61});效果:
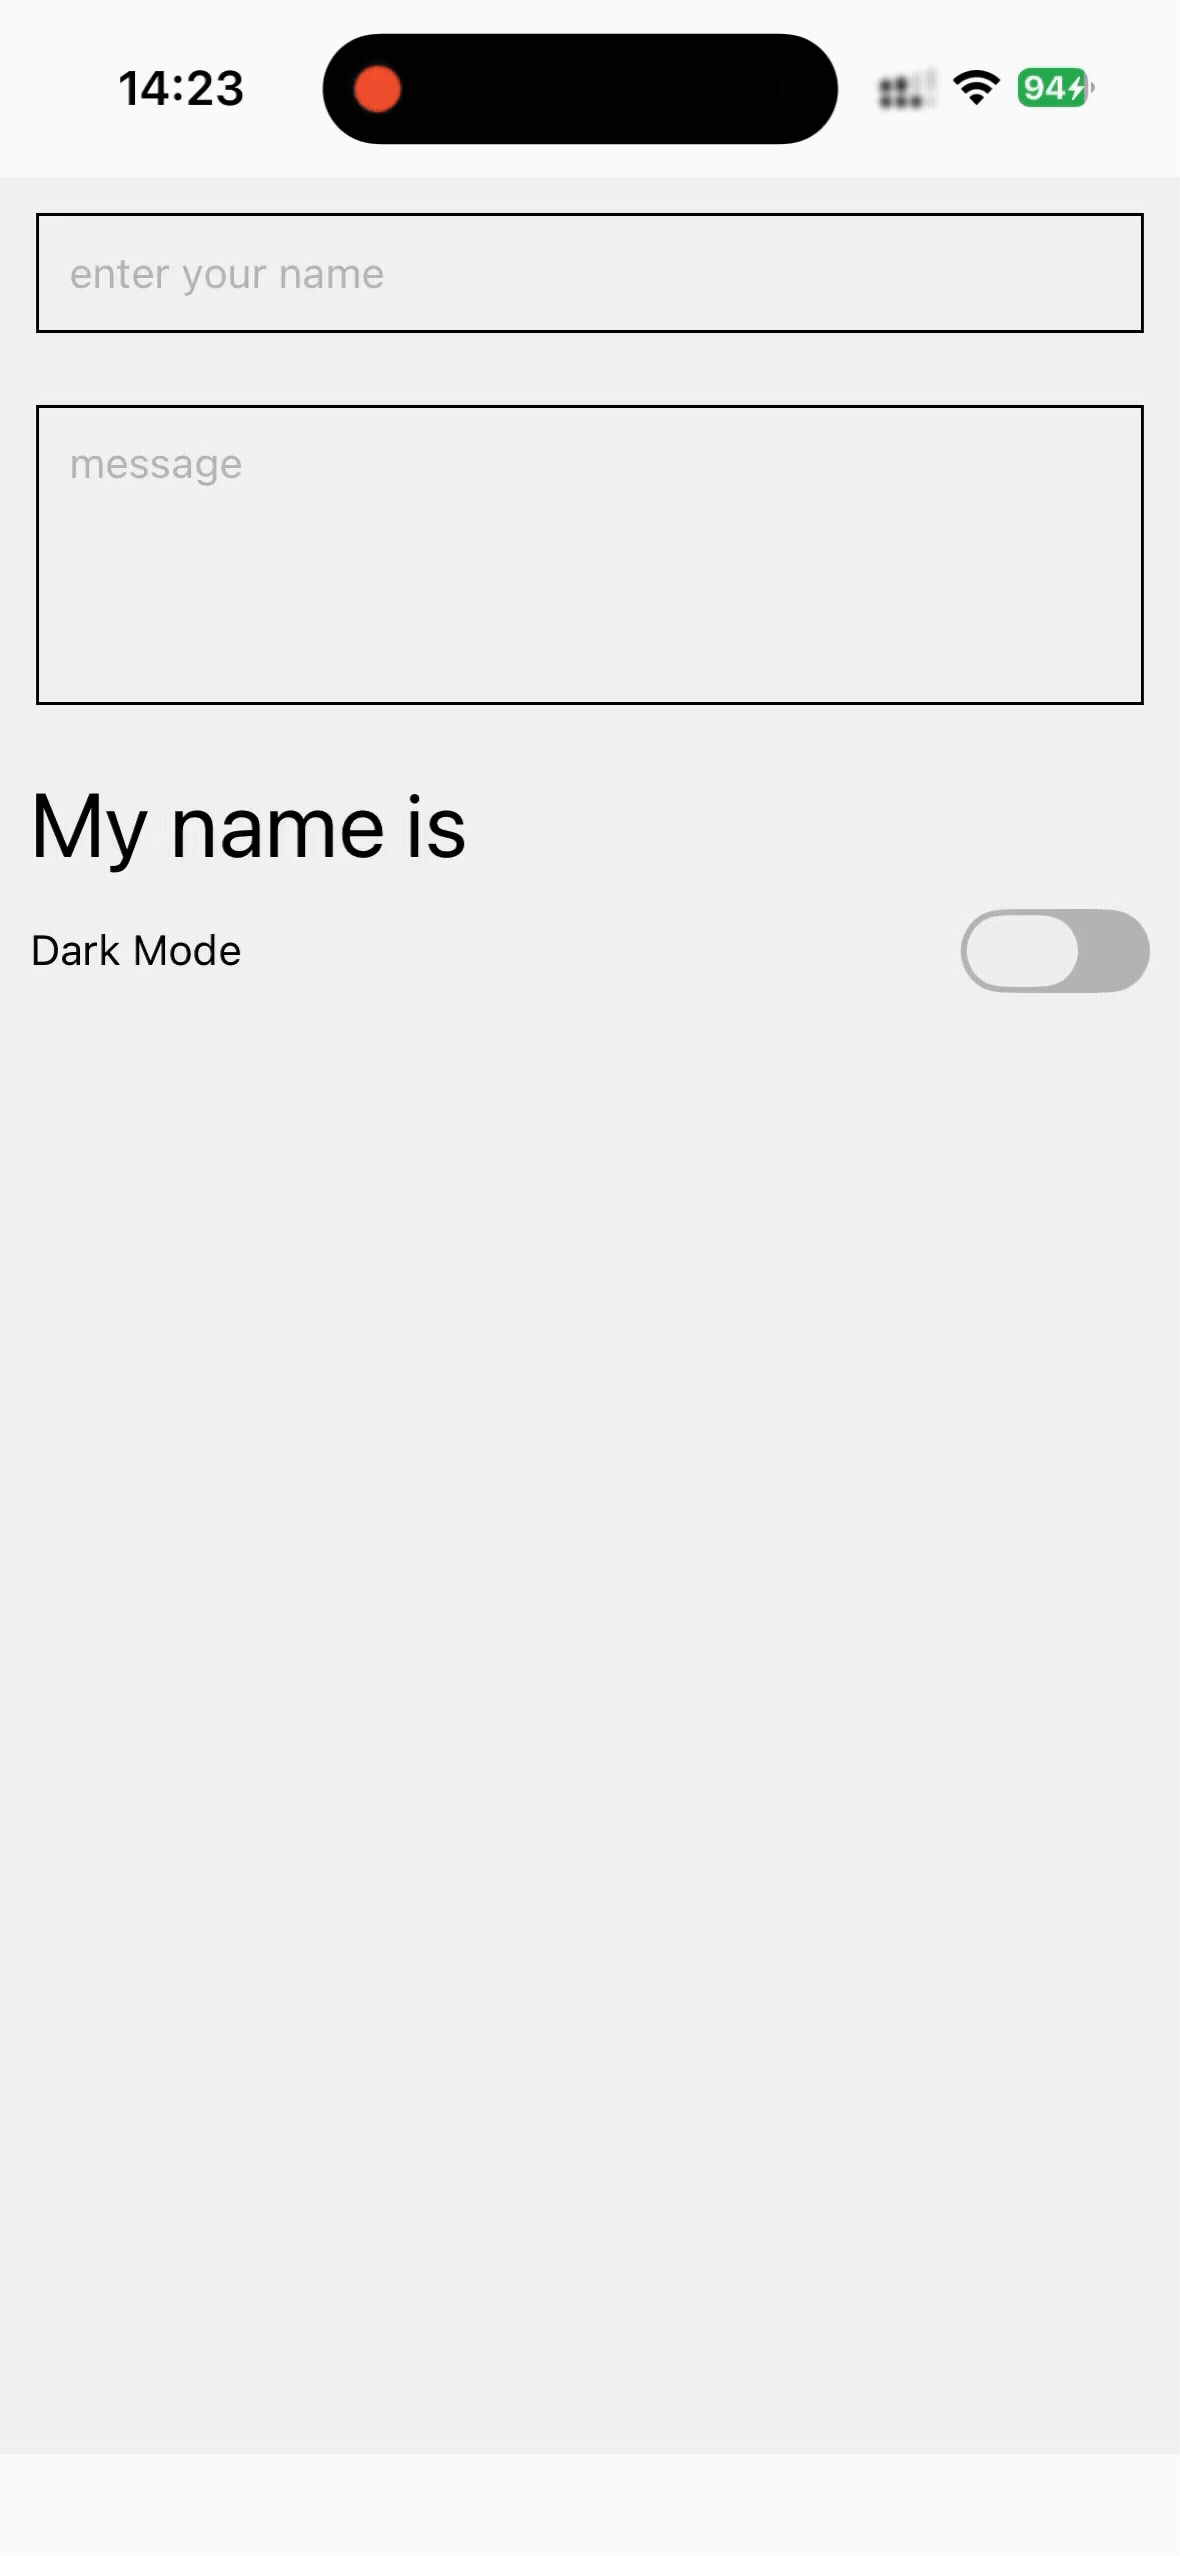
最让我感到惊奇的是,我的ios26系统的玻璃效果,都出现在上面了,太牛逼了。
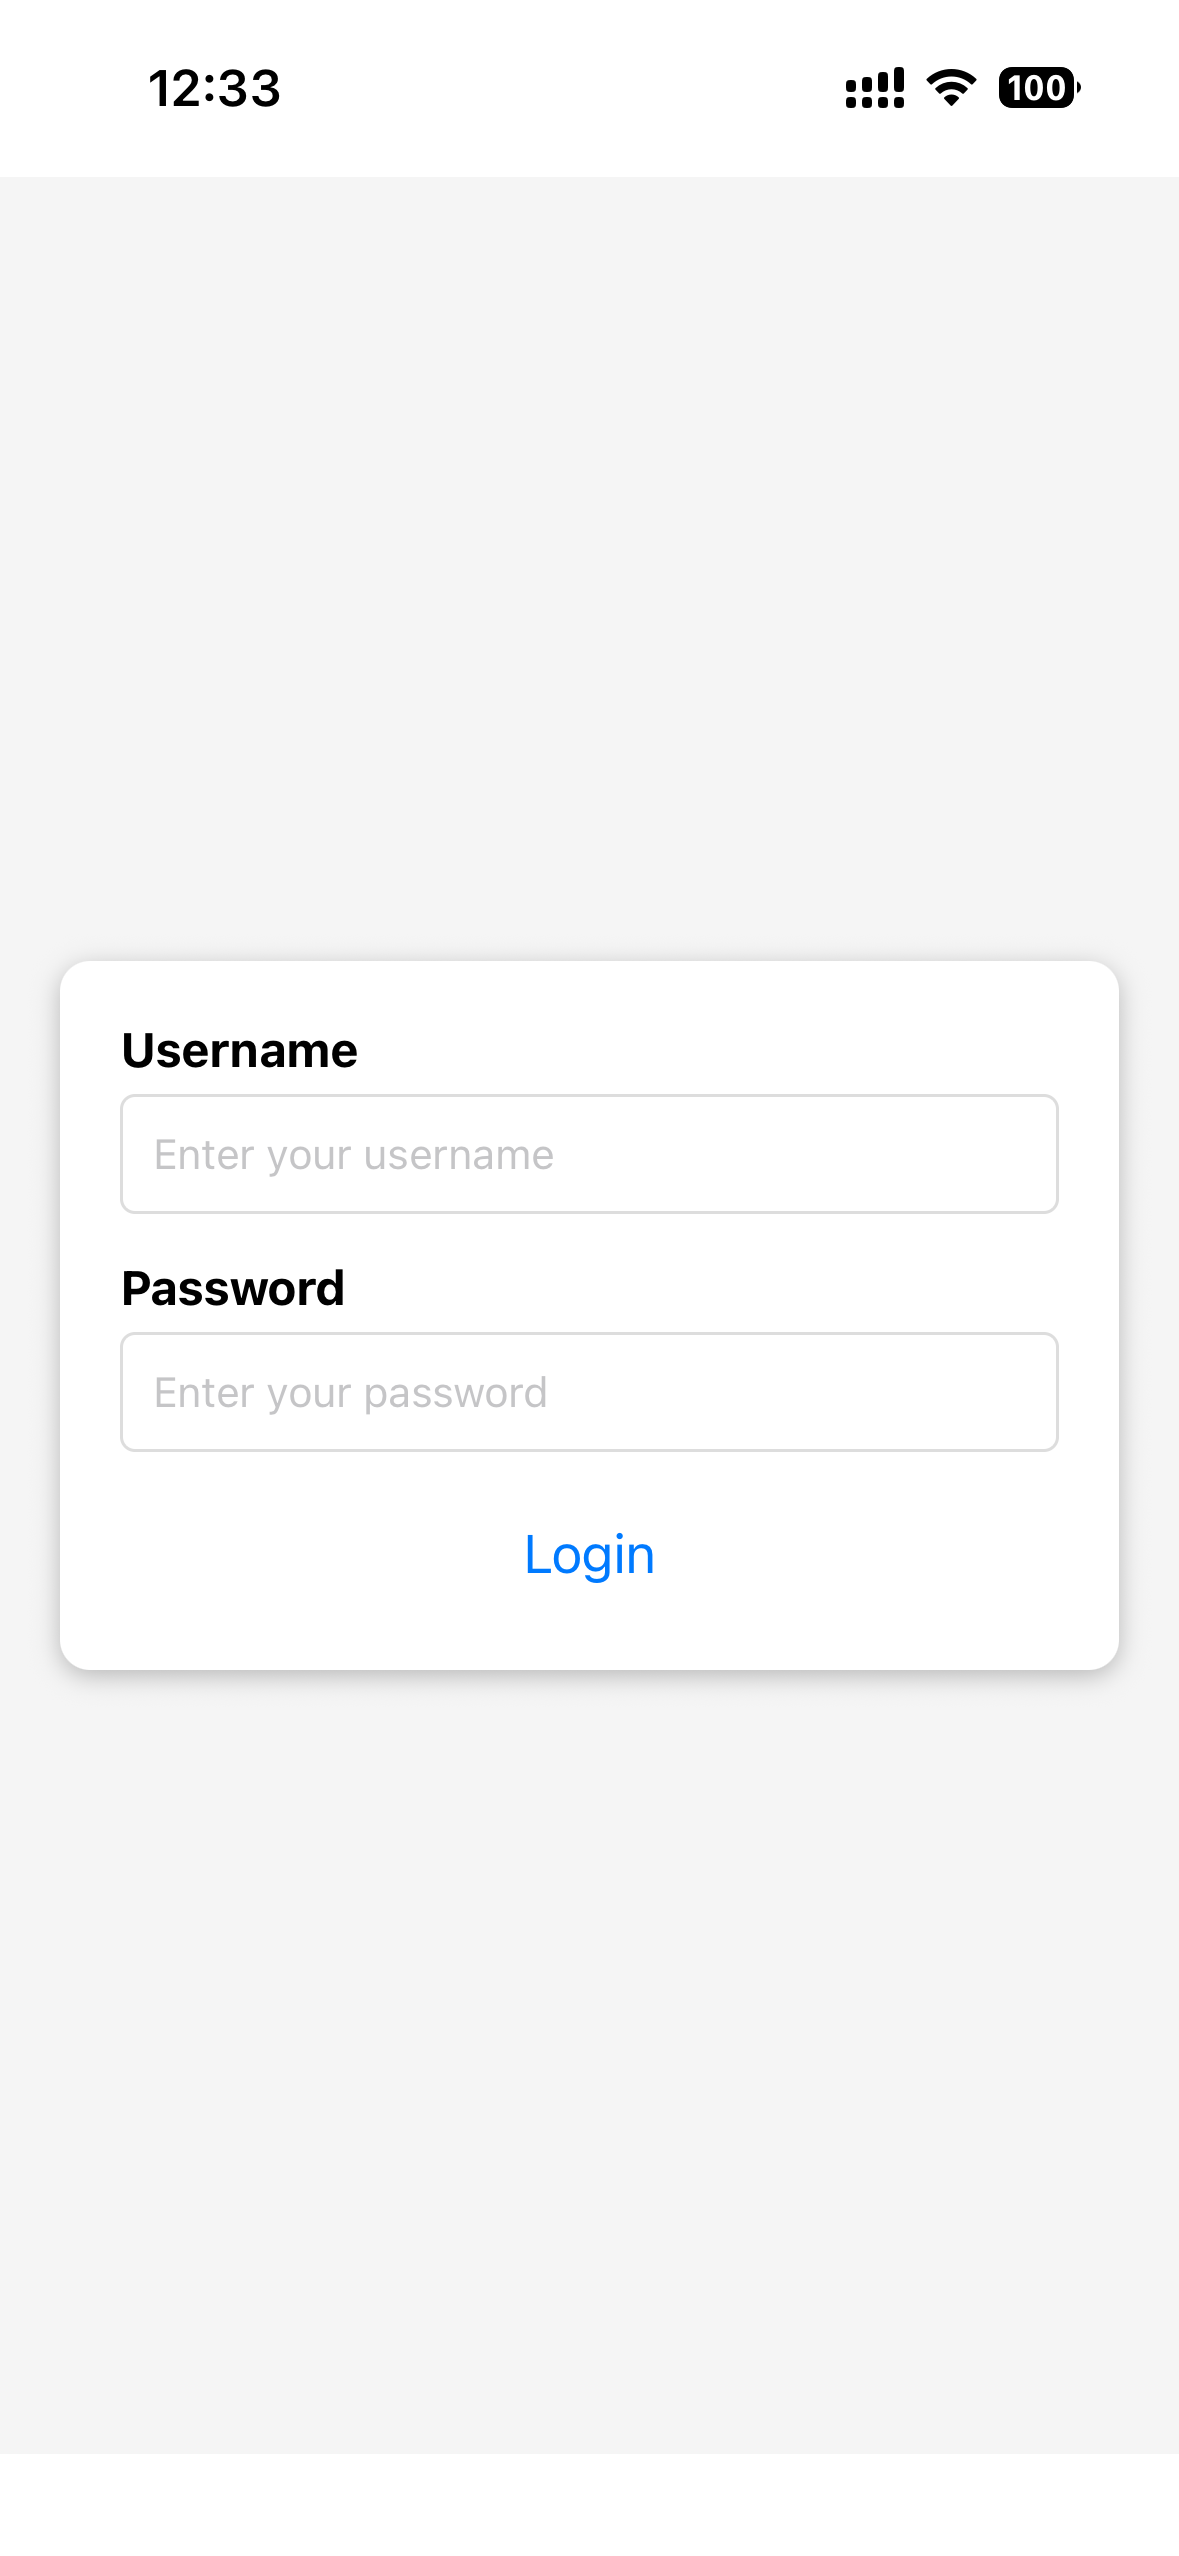
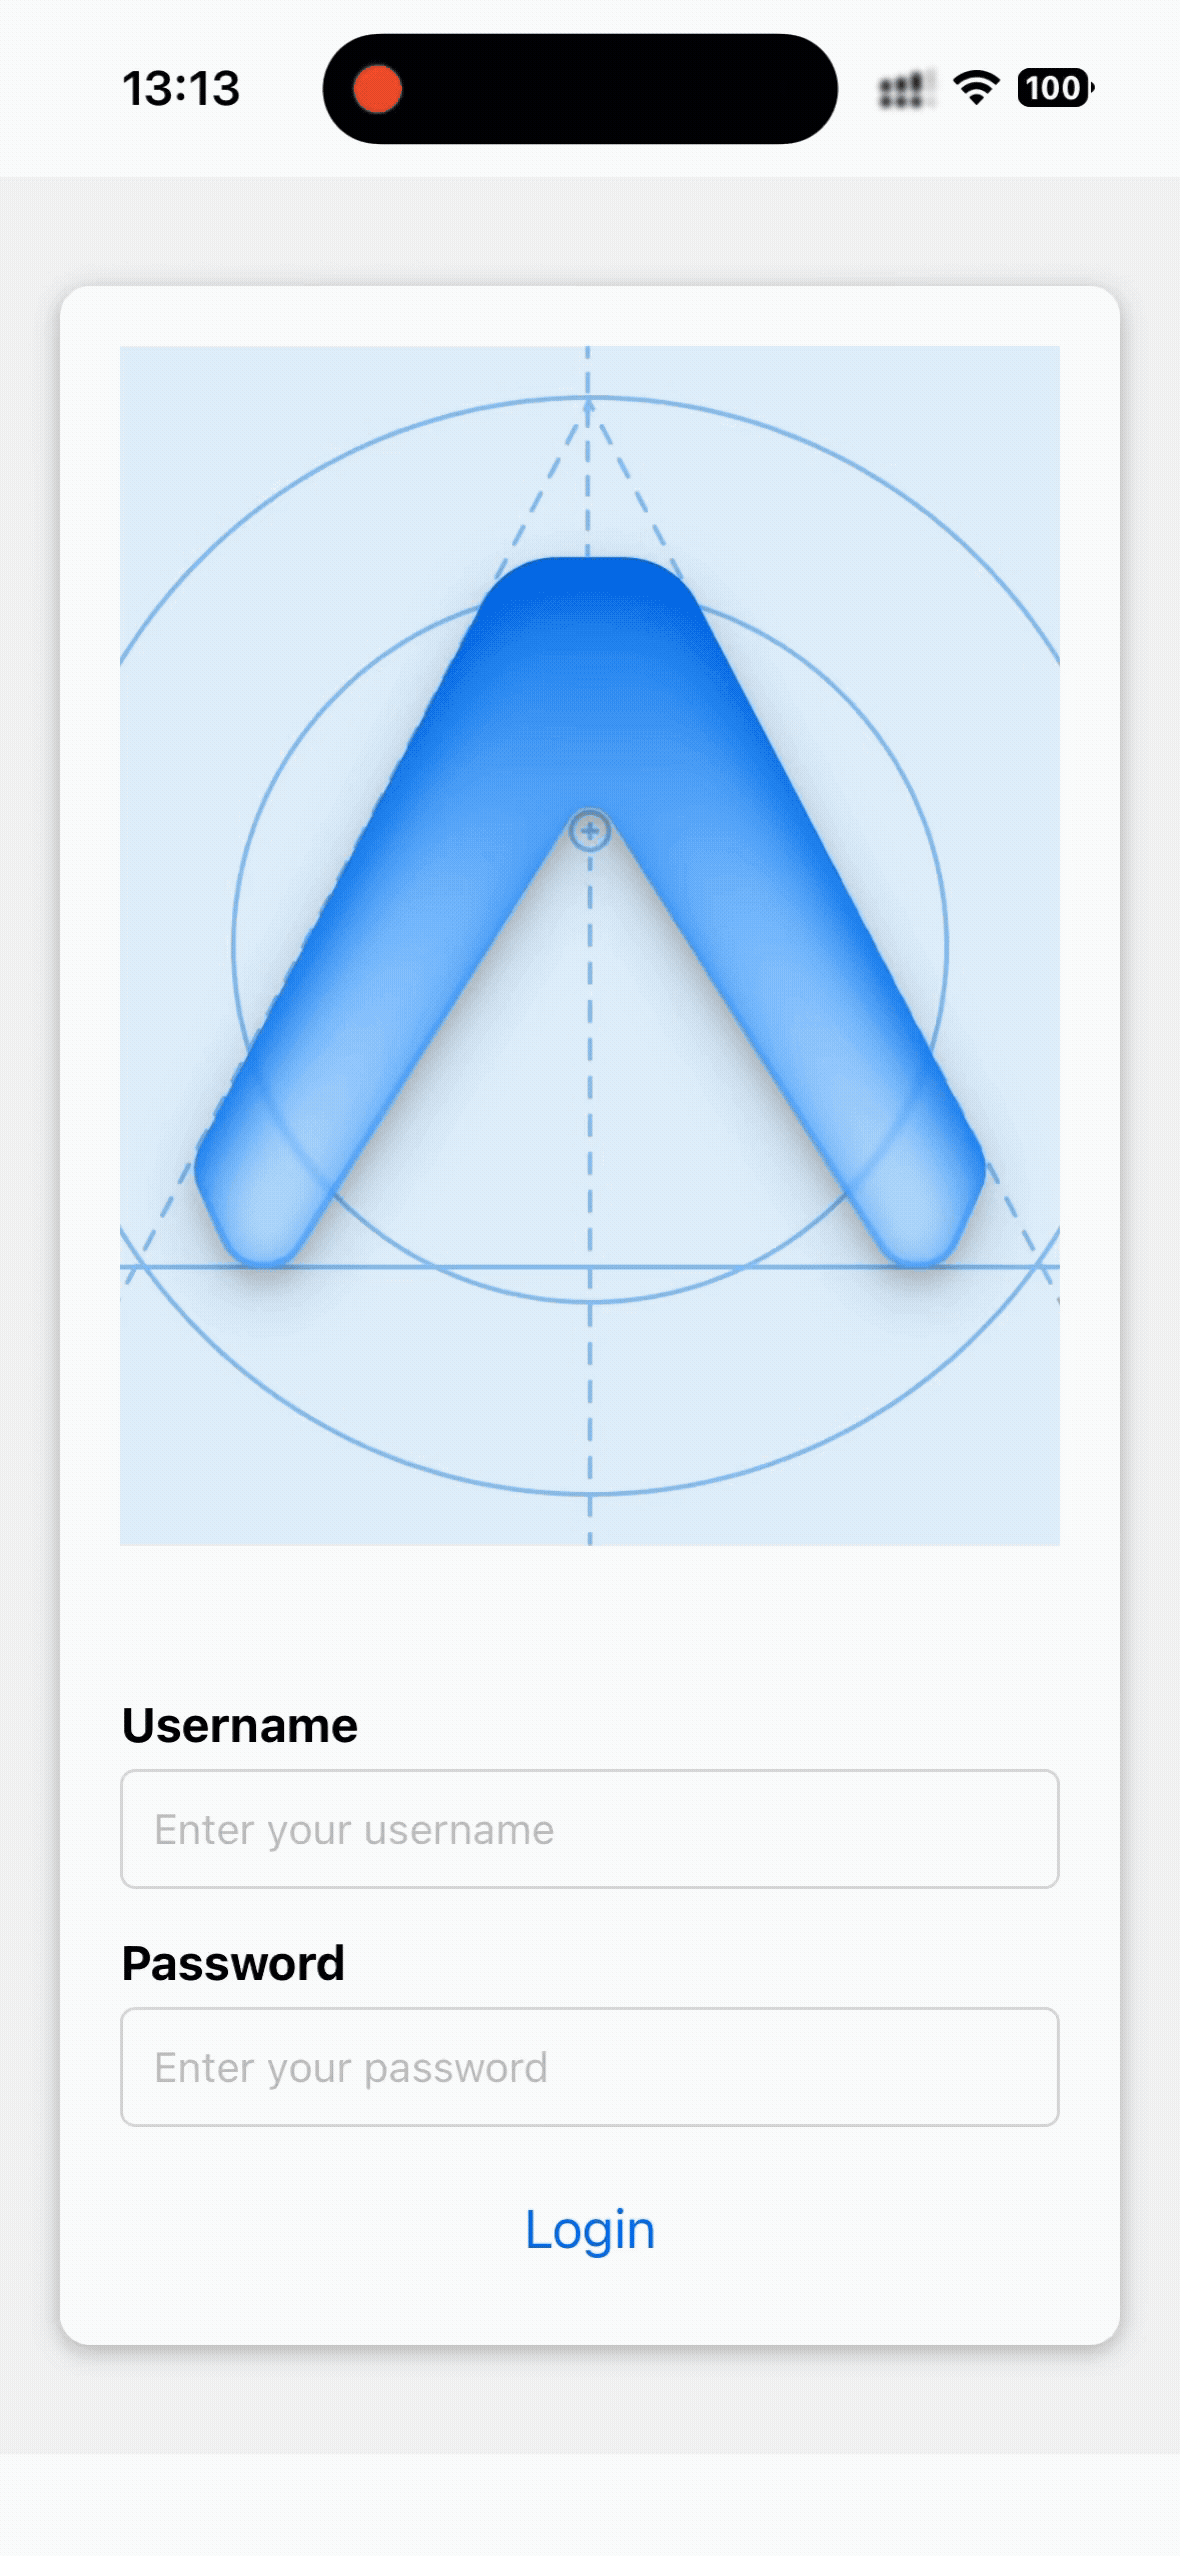
62 - Login Form
接下来的4节课,学习构建一个login form。这节课先把页面的结构写完:
xxxxxxxxxx671// app/index.tsx23import { useState } from "react";4import { View, Text, TextInput, Button, StyleSheet } from "react-native";56export default function App() {7 const [username, setUsername] = useState("");8 const [password, setPassword] = useState("");9 return (10 <View style={styles.container}>11 <View style={styles.form}>12 <Text style={styles.label}>Username</Text>13 <TextInput14 style={styles.input}15 placeholder="Enter your username"16 value={username}17 onChangeText={setUsername}18 />19 <Text style={styles.label}>Password</Text>20 <TextInput21 style={styles.input}22 placeholder="Enter your password"23 secureTextEntry24 value={password}25 onChangeText={setPassword}26 />2728 <Button title="Login" onPress={() => {}} />29 </View>30 </View>31 );32}3334const styles = StyleSheet.create({35 container: {36 flex: 1,37 justifyContent: "center",38 paddingHorizontal: 20,39 backgroundColor: "#f5f5f5",40 },41 form: {42 backgroundColor: "white",43 padding: 20,44 borderRadius: 10,45 shadowColor: "black",46 shadowOffset: {47 width: 0,48 height: 2,49 },50 shadowOpacity: 0.25,51 shadowRadius: 4,52 elevation: 5,53 },54 label: {55 fontSize: 16,56 marginBottom: 5,57 fontWeight: "bold",58 },59 input: {60 height: 40,61 borderColor: "#ddd",62 borderWidth: 1,63 marginBottom: 15,64 padding: 10,65 borderRadius: 5,66 },67});效果:
63 - KeyboardAvoidingView
上节课完成了login form的基本结构,但是存在一个问题,就是聚焦到输入框时,输入键盘会挡住login form界面,当输入框比较多的时候,剩下的输入框就无法显示并且输入了。
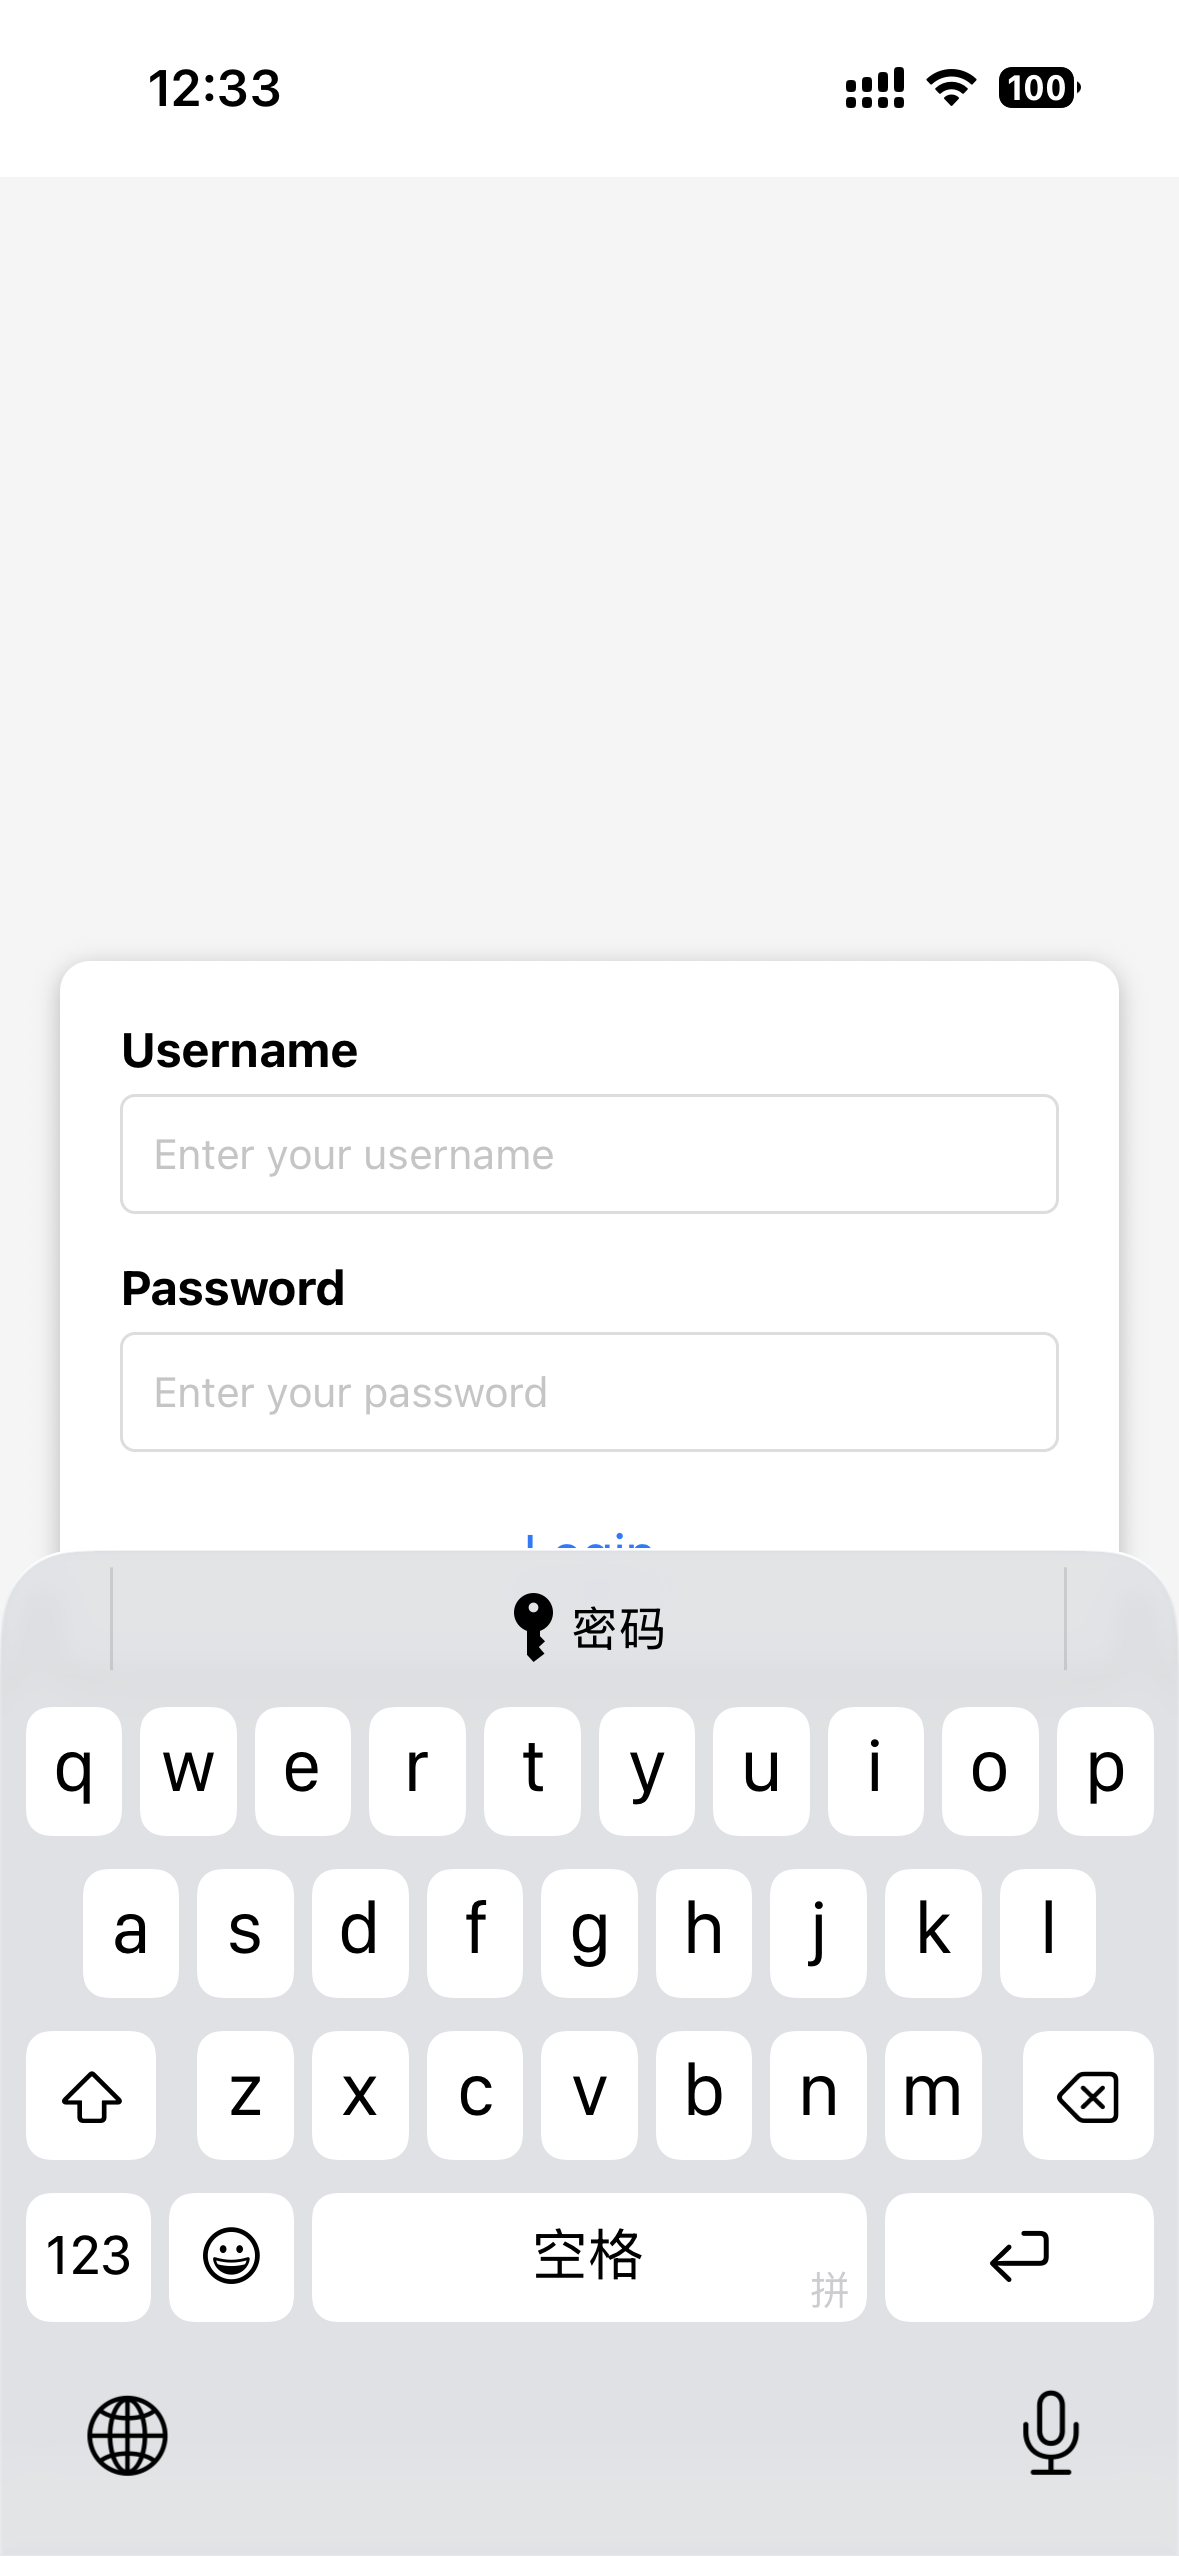
此时可以在最外层元素上使用KeyboardAvoidingView组件来解决,KeyboardAvoidingView 是 React Native 提供的一个组件,其主要作用是自动调整视图的高度、内边距或底部定位,以避免虚拟键盘遮挡用户正在编辑的输入框(如 TextInput)。
核心属性
| 属性名称 | 类型 | 描述 | 平台差异 |
|---|---|---|---|
behavior | enum | 定义视图如何调整以适应键盘。 这是最重要的属性。 | 在 iOS 上表现良好,在 Android 上行为可能不一致。 |
keyboardVerticalOffset | number | 调整键盘出现时,视图与键盘之间的垂直偏移量。 | 用于微调组件的位置,例如留出导航栏的高度。 |
contentContainerStyle | Style | 应用于其内部内容的样式。 | 否 |
behavior 属性详解
| 值 | 描述 | 适用平台 |
|---|---|---|
padding | 通过增加视图底部的 padding 来抬高内容,使输入框可见。 | 推荐在 iOS 上使用。 |
position | 通过调整视图的绝对定位 (absolute position) 来抬高内容。 | 适用于需要保持固定大小的视图。 |
height | 通过改变容器的高度来适应键盘,这种方式可能会导致不必要的重排。 | 不常用,通常不如 padding 或 position 效果好。 |
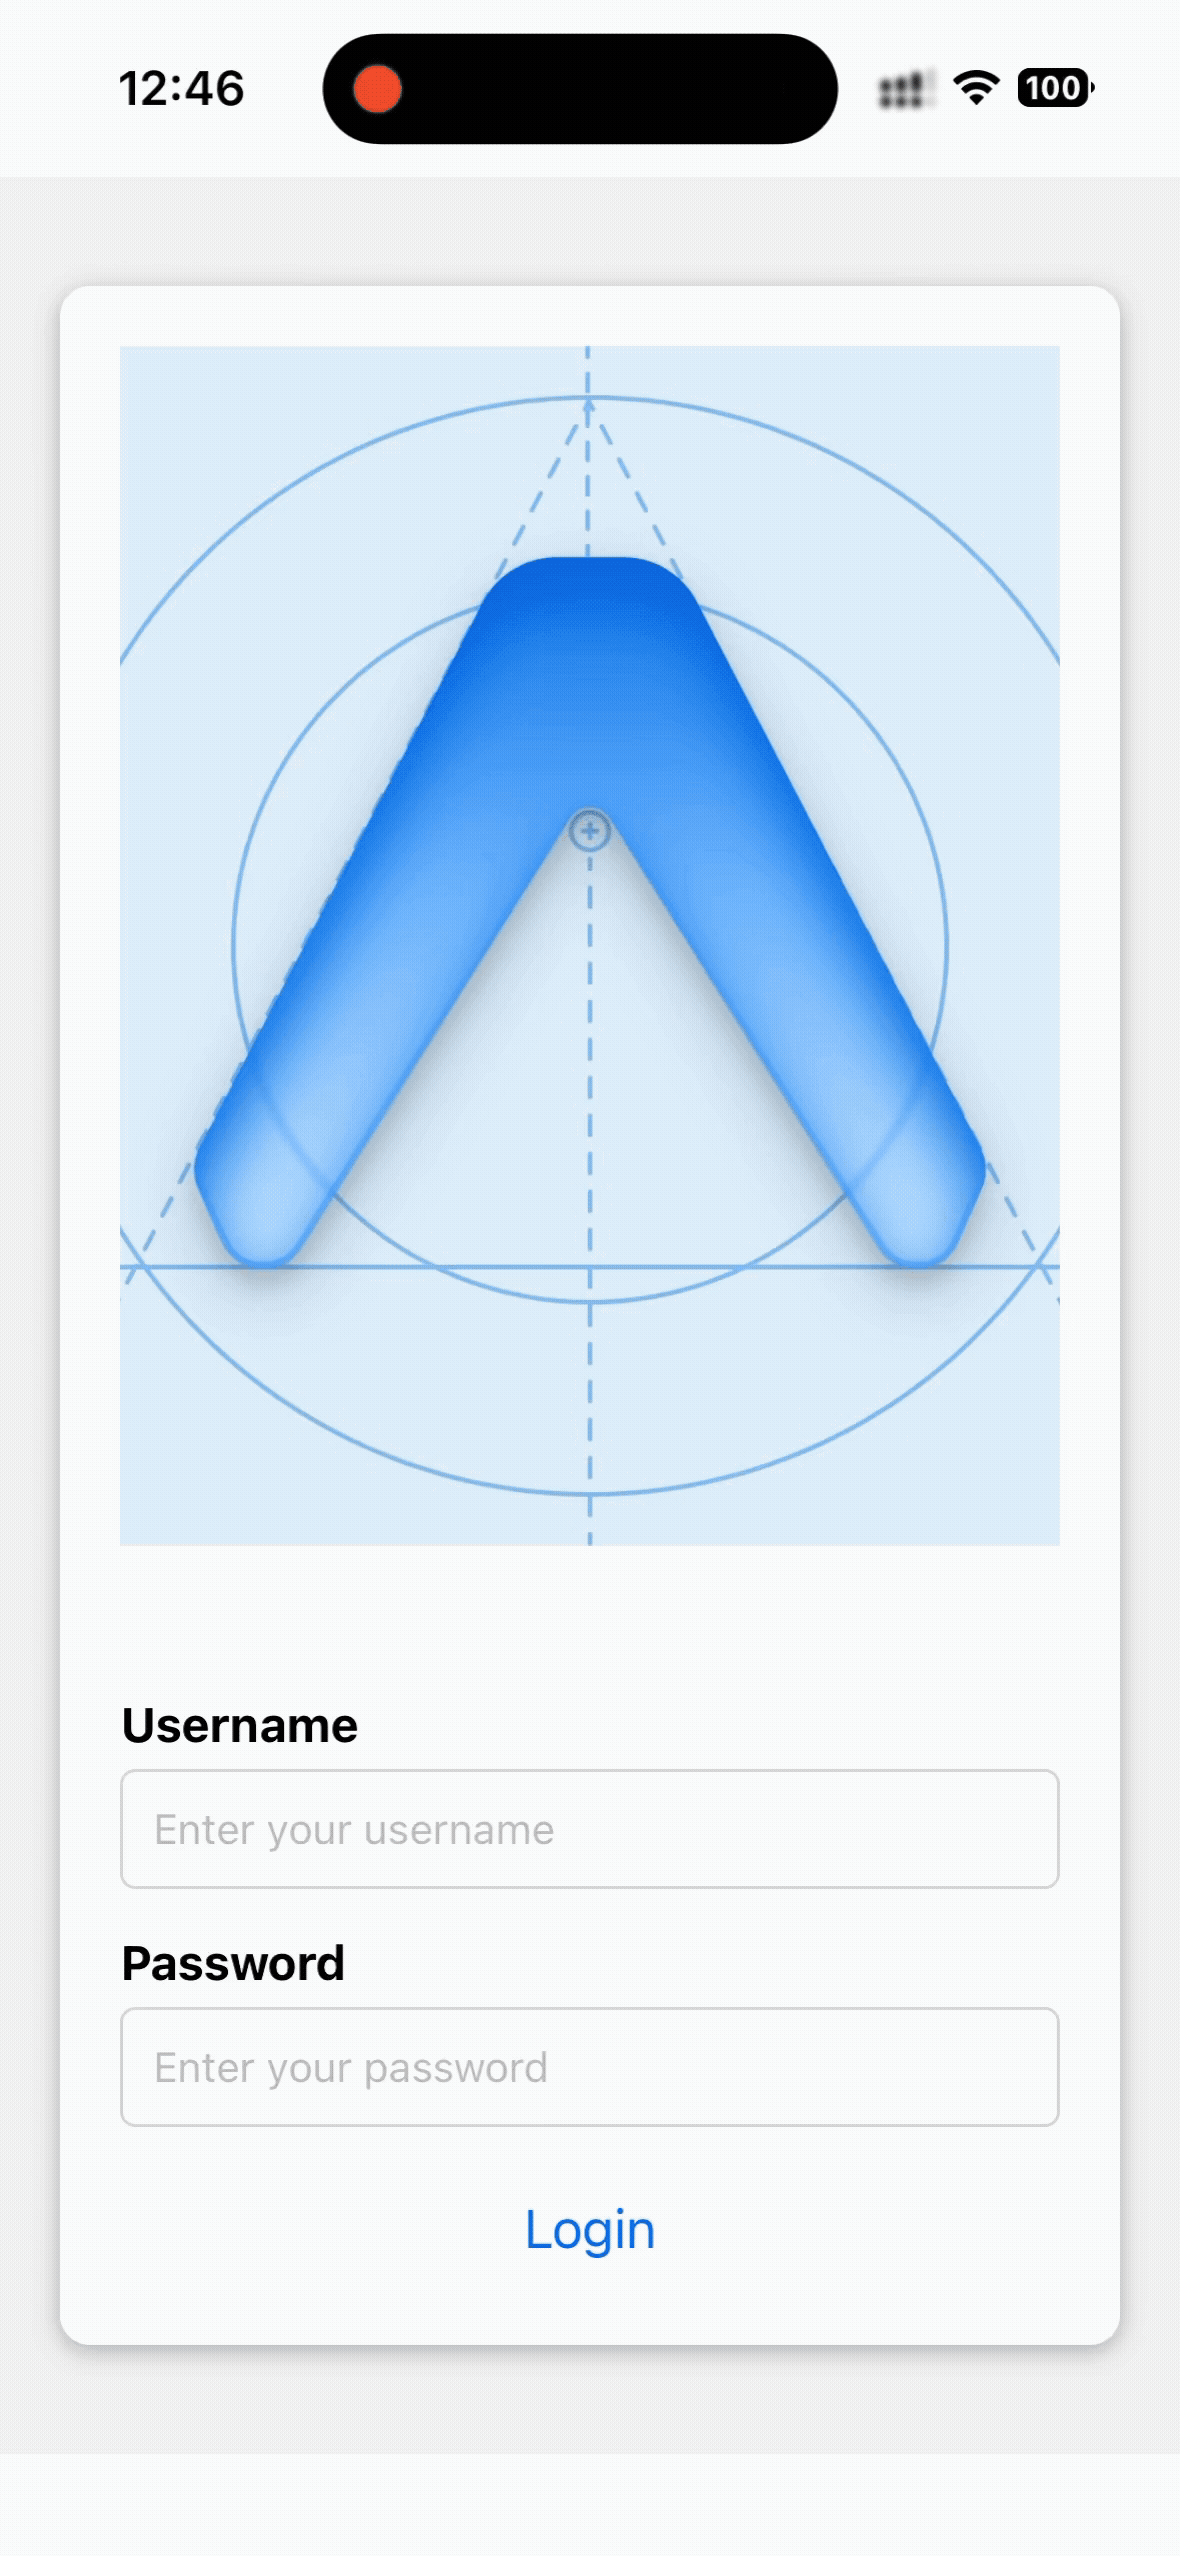
为了更加严重的说明问题,我们在login form的最上面加上一张图片,模拟form很长的情况。这时候还需要使用到keyboardVerticalOffset参数。
xxxxxxxxxx871// app/index.tsx23import { useState } from "react";4import {5 View,6 Text,7 TextInput,8 Button,9 StyleSheet,10 KeyboardAvoidingView,11 Platform,12 Image,13} from "react-native";1415export default function App() {16 const [username, setUsername] = useState("");17 const [password, setPassword] = useState("");18 return (19 // 表单遮挡情况在ios和android端可能不同,所以需要单独指定20 <KeyboardAvoidingView21 behavior="padding"22 keyboardVerticalOffset={Platform.OS === "ios" ? 200 : 0}23 style={styles.container}>24 <View style={styles.form}>25 <Image source={require("../assets/images/icon.png")} style={styles.image} />26 <Text style={styles.label}>Username</Text>27 <TextInput28 style={styles.input}29 placeholder="Enter your username"30 value={username}31 onChangeText={setUsername}32 />33 <Text style={styles.label}>Password</Text>34 <TextInput35 style={styles.input}36 placeholder="Enter your password"37 secureTextEntry38 value={password}39 onChangeText={setPassword}40 />4142 <Button title="Login" onPress={() => {}} />43 </View>44 </KeyboardAvoidingView>45 );46}4748const styles = StyleSheet.create({49 container: {50 flex: 1,51 justifyContent: "center",52 paddingHorizontal: 20,53 backgroundColor: "#f5f5f5",54 },55 form: {56 backgroundColor: "white",57 padding: 20,58 borderRadius: 10,59 shadowColor: "black",60 shadowOffset: {61 width: 0,62 height: 2,63 },64 shadowOpacity: 0.25,65 shadowRadius: 4,66 elevation: 5,67 },68 label: {69 fontSize: 16,70 marginBottom: 5,71 fontWeight: "bold",72 },73 input: {74 height: 40,75 borderColor: "#ddd",76 borderWidth: 1,77 marginBottom: 15,78 padding: 10,79 borderRadius: 5,80 },81 image: {82 width: "100%",83 height: 400,84 alignSelf: "center",85 marginBottom: 50,86 },87});可以看到,调整到可以显示login按钮了。
64 - Form Validation
这节课学习怎么为form添加校验。
xxxxxxxxxx1091// app/index.tsx23import { useState } from "react";4import {5 View,6 Text,7 TextInput,8 Button,9 StyleSheet,10 KeyboardAvoidingView,11 Platform,12 Image,13} from "react-native";1415type ErrorsType = {16 username?: string;17 password?: string;18};1920export default function App() {21 const [username, setUsername] = useState("");22 const [password, setPassword] = useState("");23 const [errors, setErrors] = useState<ErrorsType>({});2425 const handleValidate = () => {26 let errors: ErrorsType = {};2728 if (!username) errors.username = "Username is required";29 if (!password) errors.password = "Password is required";3031 setErrors(errors);32 return Object.keys(errors).length === 0;33 };3435 return (36 <KeyboardAvoidingView37 behavior="padding"38 keyboardVerticalOffset={Platform.OS === "ios" ? 200 : 0}39 style={styles.container}>40 <View style={styles.form}>41 <Image source={require("../assets/images/icon.png")} style={styles.image} />42 <Text style={styles.label}>Username</Text>43 <TextInput44 style={styles.input}45 placeholder="Enter your username"46 value={username}47 onChangeText={setUsername}48 />49 {errors.username && <Text style={styles.errorText}>{errors.username}</Text>}50 <Text style={styles.label}>Password</Text>51 <TextInput52 style={styles.input}53 placeholder="Enter your password"54 secureTextEntry55 value={password}56 onChangeText={setPassword}57 />58 {errors.password && <Text style={styles.errorText}>{errors.password}</Text>}5960 <Button title="Login" onPress={() => {}} />61 </View>62 </KeyboardAvoidingView>63 );64}6566const styles = StyleSheet.create({67 container: {68 flex: 1,69 justifyContent: "center",70 paddingHorizontal: 20,71 backgroundColor: "#f5f5f5",72 },73 form: {74 backgroundColor: "white",75 padding: 20,76 borderRadius: 10,77 shadowColor: "black",78 shadowOffset: {79 width: 0,80 height: 2,81 },82 shadowOpacity: 0.25,83 shadowRadius: 4,84 elevation: 5,85 },86 label: {87 fontSize: 16,88 marginBottom: 5,89 fontWeight: "bold",90 },91 input: {92 height: 40,93 borderColor: "#ddd",94 borderWidth: 1,95 marginBottom: 15,96 padding: 10,97 borderRadius: 5,98 },99 image: {100 width: "100%",101 height: 400,102 alignSelf: "center",103 marginBottom: 50,104 },105 errorText: {106 color: "red",107 marginBottom: 10,108 },109});65 - Form Submission
这节课学习表单提交。定义handleSubmit函数。
xxxxxxxxxx1181// app/index.tsx23import { useState } from "react";4import {5 View,6 Text,7 TextInput,8 Button,9 StyleSheet,10 KeyboardAvoidingView,11 Platform,12 Image,13} from "react-native";1415type ErrorsType = {16 username?: string;17 password?: string;18};1920export default function App() {21 const [username, setUsername] = useState("");22 const [password, setPassword] = useState("");23 const [errors, setErrors] = useState<ErrorsType>({});2425 const handleValidate = () => {26 let errors: ErrorsType = {};2728 if (!username) errors.username = "Username is required";29 if (!password) errors.password = "Password is required";3031 setErrors(errors);32 return Object.keys(errors).length === 0;33 };3435 const handleSubmit = () => {36 if (handleValidate()) {37 setUsername("");38 setPassword("");39 setErrors({});40 alert("Submit successfully");41 }42 };4344 return (45 <KeyboardAvoidingView46 behavior="padding"47 keyboardVerticalOffset={Platform.OS === "ios" ? 200 : 0}48 style={styles.container}>49 <View style={styles.form}>50 <Image source={require("../assets/images/icon.png")} style={styles.image} />51 <Text style={styles.label}>Username</Text>52 <TextInput53 style={styles.input}54 placeholder="Enter your username"55 value={username}56 onChangeText={setUsername}57 />58 {errors.username && <Text style={styles.errorText}>{errors.username}</Text>}59 <Text style={styles.label}>Password</Text>60 <TextInput61 style={styles.input}62 placeholder="Enter your password"63 secureTextEntry64 value={password}65 onChangeText={setPassword}66 />67 {errors.password && <Text style={styles.errorText}>{errors.password}</Text>}6869 <Button title="Login" onPress={handleSubmit} />70 </View>71 </KeyboardAvoidingView>72 );73}7475const styles = StyleSheet.create({76 container: {77 flex: 1,78 justifyContent: "center",79 paddingHorizontal: 20,80 backgroundColor: "#f5f5f5",81 },82 form: {83 backgroundColor: "white",84 padding: 20,85 borderRadius: 10,86 shadowColor: "black",87 shadowOffset: {88 width: 0,89 height: 2,90 },91 shadowOpacity: 0.25,92 shadowRadius: 4,93 elevation: 5,94 },95 label: {96 fontSize: 16,97 marginBottom: 5,98 fontWeight: "bold",99 },100 input: {101 height: 40,102 borderColor: "#ddd",103 borderWidth: 1,104 marginBottom: 15,105 padding: 10,106 borderRadius: 5,107 },108 image: {109 width: "100%",110 height: 400,111 alignSelf: "center",112 marginBottom: 50,113 },114 errorText: {115 color: "red",116 marginBottom: 10,117 },118});因为录屏好像录不了密码输入的过程,所以下面gif里面输入密码的过程看不到,但是实际效果是OK的:
66 - Networking
在react native中,可以使用tanstatck/react-query来做网络请求,这个非常方便。但是课程上直接使用JS代码来请求。
创建项目npx create-expo-app@latest RNNetworking,运行nm run reset-project重置项目。
在根目录里面创建db.json,将jsonplaceholder.typicode.com里面的posts数据放进去,使用Json-server来做后端服务。启动服务json-server --watch ./db.json --port 4000。
初始化页面:
xxxxxxxxxx151// app/index.tsx23import { Text, View, StatusBar, StyleSheet } from "react-native";45export default function Index() {6 return <View style={styles.container}></View>;7}89const styles = StyleSheet.create({10 container: {11 flex: 1,12 backgroundColor: "#f5f5f5",13 paddingTop: StatusBar.currentHeight,14 },15});67 - GET Requests
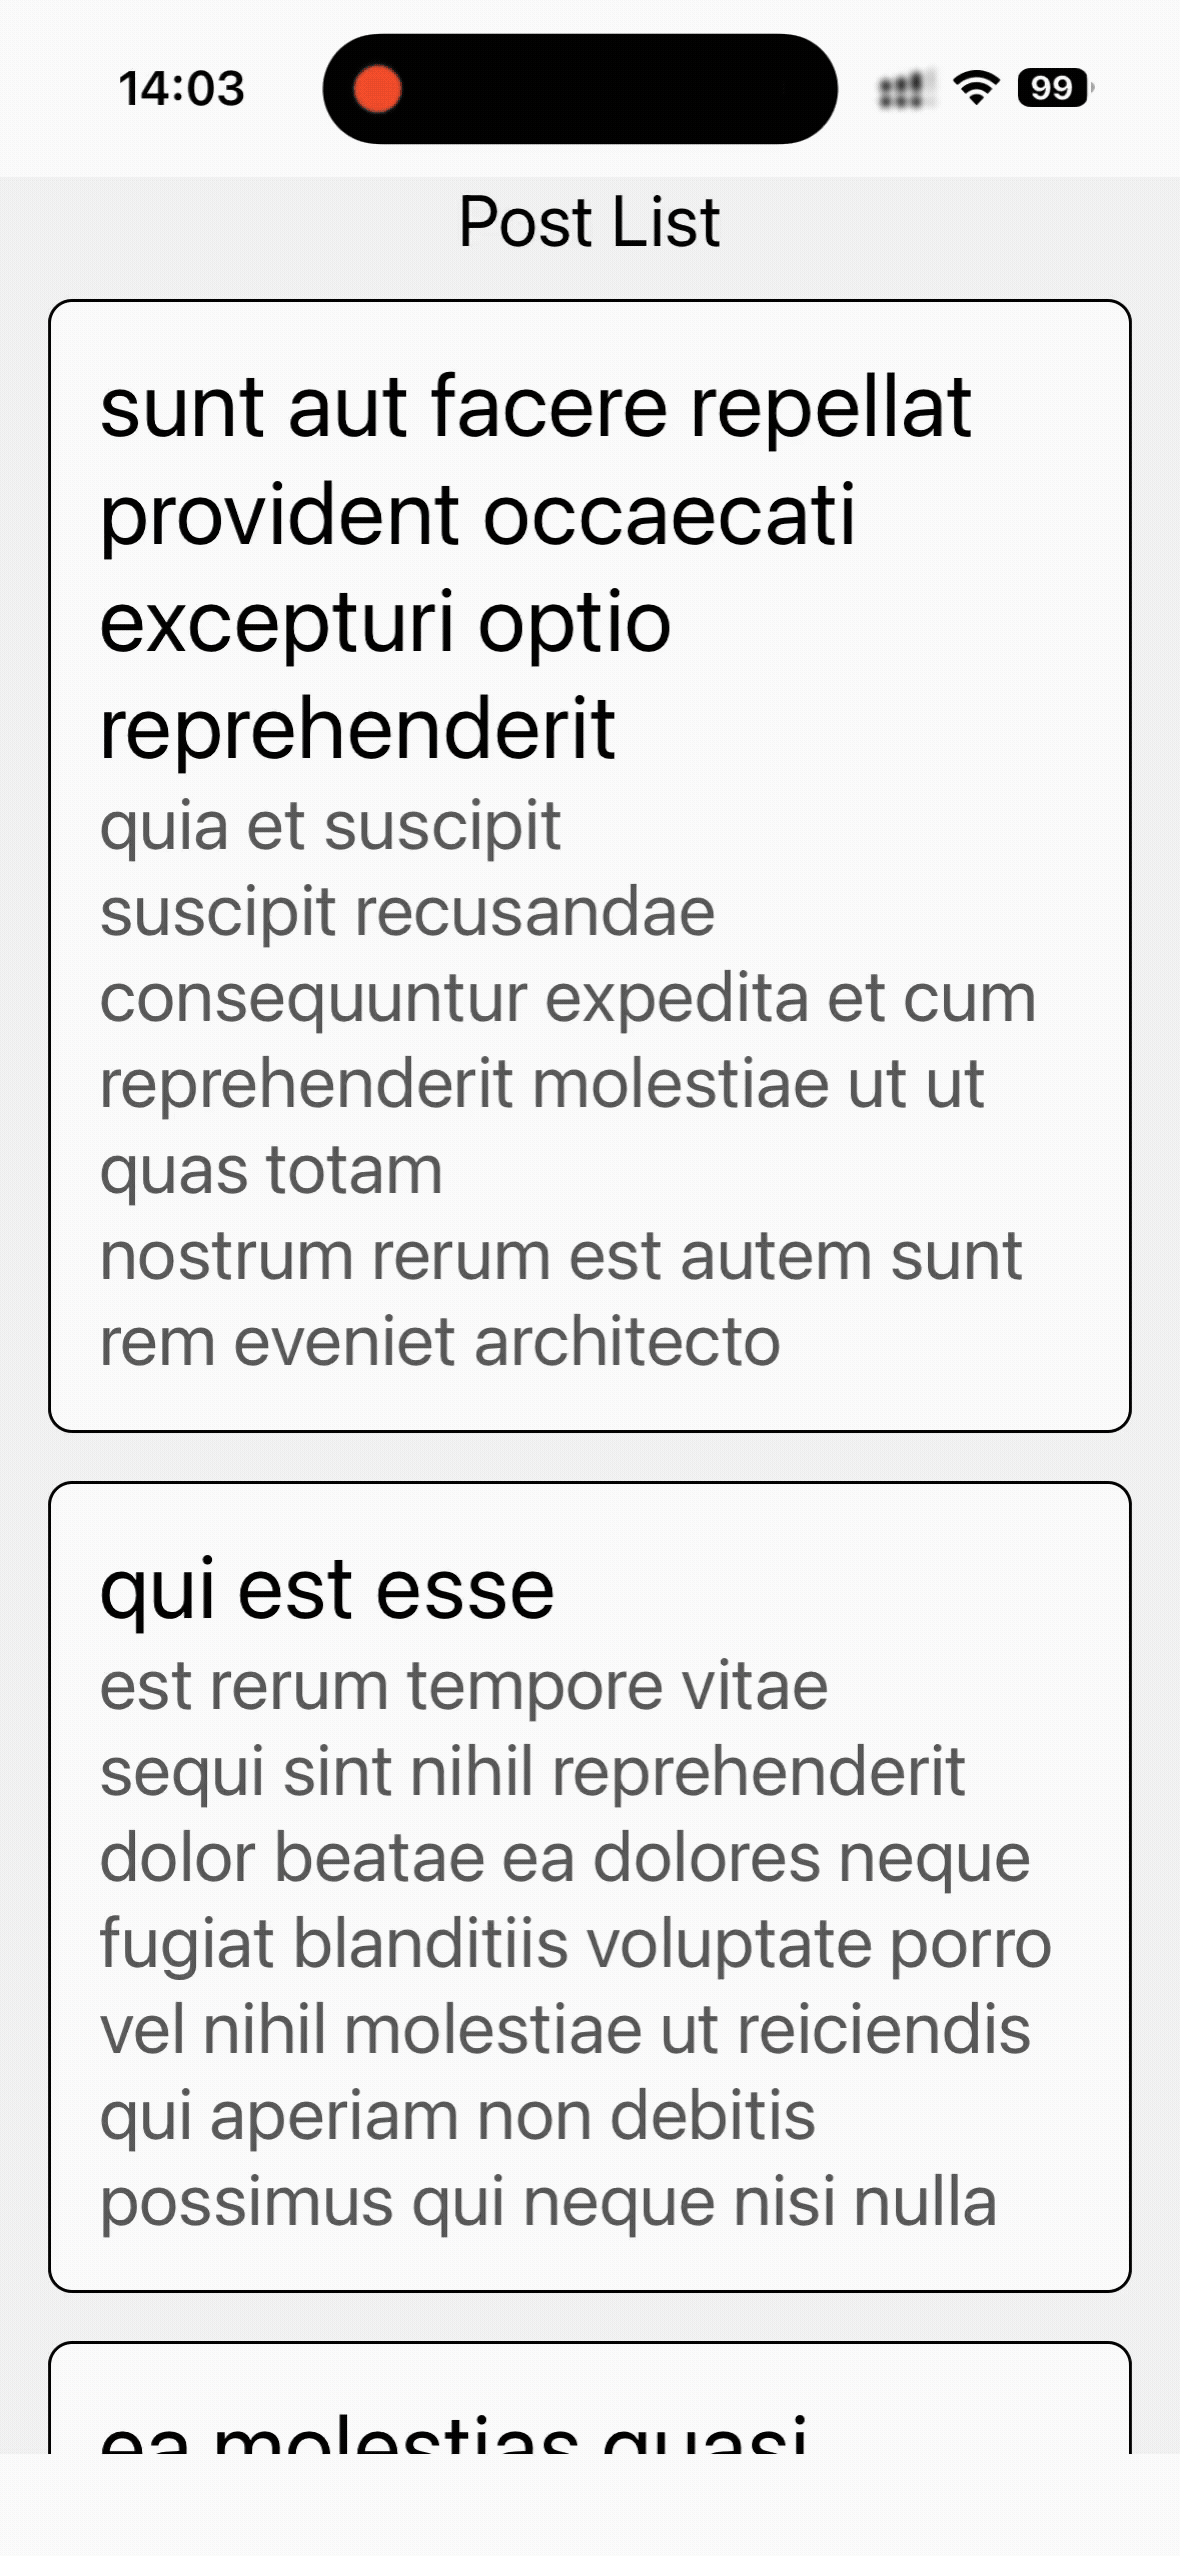
编写GET请求,渲染list列表:
xxxxxxxxxx741// app/index.tsx23import { useEffect, useState } from "react";4import { Text, View, StatusBar, StyleSheet, FlatList } from "react-native";56export default function Index() {7 const [postList, setPostList] = useState<{ id: string; title: string; body: string }[]>([]);89 const fetchData = async (limit = 10) => {10 // 这里要写成本地ipv4的地址,不能使用localhost,否则会报错Call stack error11 const response = await fetch(`http://192.168.31.180:4000/posts?_limit=${limit}`);12 const data = await response.json();13 setPostList(data);14 };1516 useEffect(() => {17 fetchData();18 }, []);19 return (20 <View style={styles.container}>21 <View style={styles.listContainer}>22 <FlatList23 data={postList}24 renderItem={({ item }) => {25 return (26 <View key={item.id} style={styles.card}>27 <Text style={styles.titleText}>{item.title}</Text>28 <Text style={styles.bodyText}>{item.body}</Text>29 </View>30 );31 }}32 ListEmptyComponent={() => <Text>No Posts Found</Text>}33 ListHeaderComponent={() => <Text style={styles.headerText}>Post List</Text>}34 ListFooterComponent={() => <Text style={styles.footerText}>End of list</Text>}35 />36 </View>37 </View>38 );39}4041const styles = StyleSheet.create({42 container: {43 flex: 1,44 backgroundColor: "#f5f5f5",45 paddingTop: StatusBar.currentHeight,46 },47 listContainer: {48 flex: 1,49 paddingHorizontal: 16,50 },51 card: {52 backgroundColor: "white",53 padding: 16,54 borderRadius: 8,55 borderWidth: 1,56 },57 titleText: {58 fontSize: 30,59 },60 bodyText: {61 fontSize: 24,62 color: "#666",63 },64 headerText: {65 fontSize: 24,66 textAlign: "center",67 marginBottom: 12,68 },69 footerText: {70 fontSize: 24,71 textAlign: "center",72 marginTop: 12,73 },74});效果:
68 - Loading State
这节课学习为接口请求添加loading效果。使用ActivityIndicator来展示Loading效果。
xxxxxxxxxx941// app/index.tsx23import { useEffect, useState } from "react";4import { Text, View, StatusBar, StyleSheet, FlatList, ActivityIndicator } from "react-native";56export default function Index() {7 const [postList, setPostList] = useState<{ id: string; title: string; body: string }[]>([]);8 const [isLoading, setIsLoading] = useState(true);910 const fetchData = async (limit = 10) => {11 await new Promise((resolve) => setTimeout(resolve, 1000));12 const response = await fetch(`http://192.168.31.180:4000/posts?_limit=${limit}`);13 const data = await response.json();14 setPostList(data);15 setIsLoading(false);16 };1718 useEffect(() => {19 fetchData();20 }, []);2122 if (isLoading) {23 return (24 <View style={styles.loadingContainer}>25 <ActivityIndicator size="large" color="0000ff" />26 <Text>Loading...</Text>27 </View>28 );29 }3031 return (32 <View style={styles.container}>33 <View style={styles.listContainer}>34 <FlatList35 data={postList}36 renderItem={({ item }) => {37 return (38 <View key={item.id} style={styles.card}>39 <Text style={styles.titleText}>{item.title}</Text>40 <Text style={styles.bodyText}>{item.body}</Text>41 </View>42 );43 }}44 ItemSeparatorComponent={() => <View style={{ height: 16 }} />}45 ListEmptyComponent={() => <Text>No Posts Found</Text>}46 ListHeaderComponent={() => <Text style={styles.headerText}>Post List</Text>}47 ListFooterComponent={() => <Text style={styles.footerText}>End of list</Text>}48 />49 </View>50 </View>51 );52}5354const styles = StyleSheet.create({55 container: {56 flex: 1,57 backgroundColor: "#f5f5f5",58 paddingTop: StatusBar.currentHeight,59 },60 listContainer: {61 flex: 1,62 paddingHorizontal: 16,63 },64 card: {65 backgroundColor: "white",66 padding: 16,67 borderRadius: 8,68 borderWidth: 1,69 },70 titleText: {71 fontSize: 30,72 },73 bodyText: {74 fontSize: 24,75 color: "#666",76 },77 headerText: {78 fontSize: 24,79 textAlign: "center",80 marginBottom: 12,81 },82 footerText: {83 fontSize: 24,84 textAlign: "center",85 marginTop: 12,86 },87 loadingContainer: {88 flex: 1,89 backgroundColor: "#f5f5f5",90 paddingTop: StatusBar.currentHeight,91 justifyContent: "center",92 alignItems: "center",93 },94});效果:

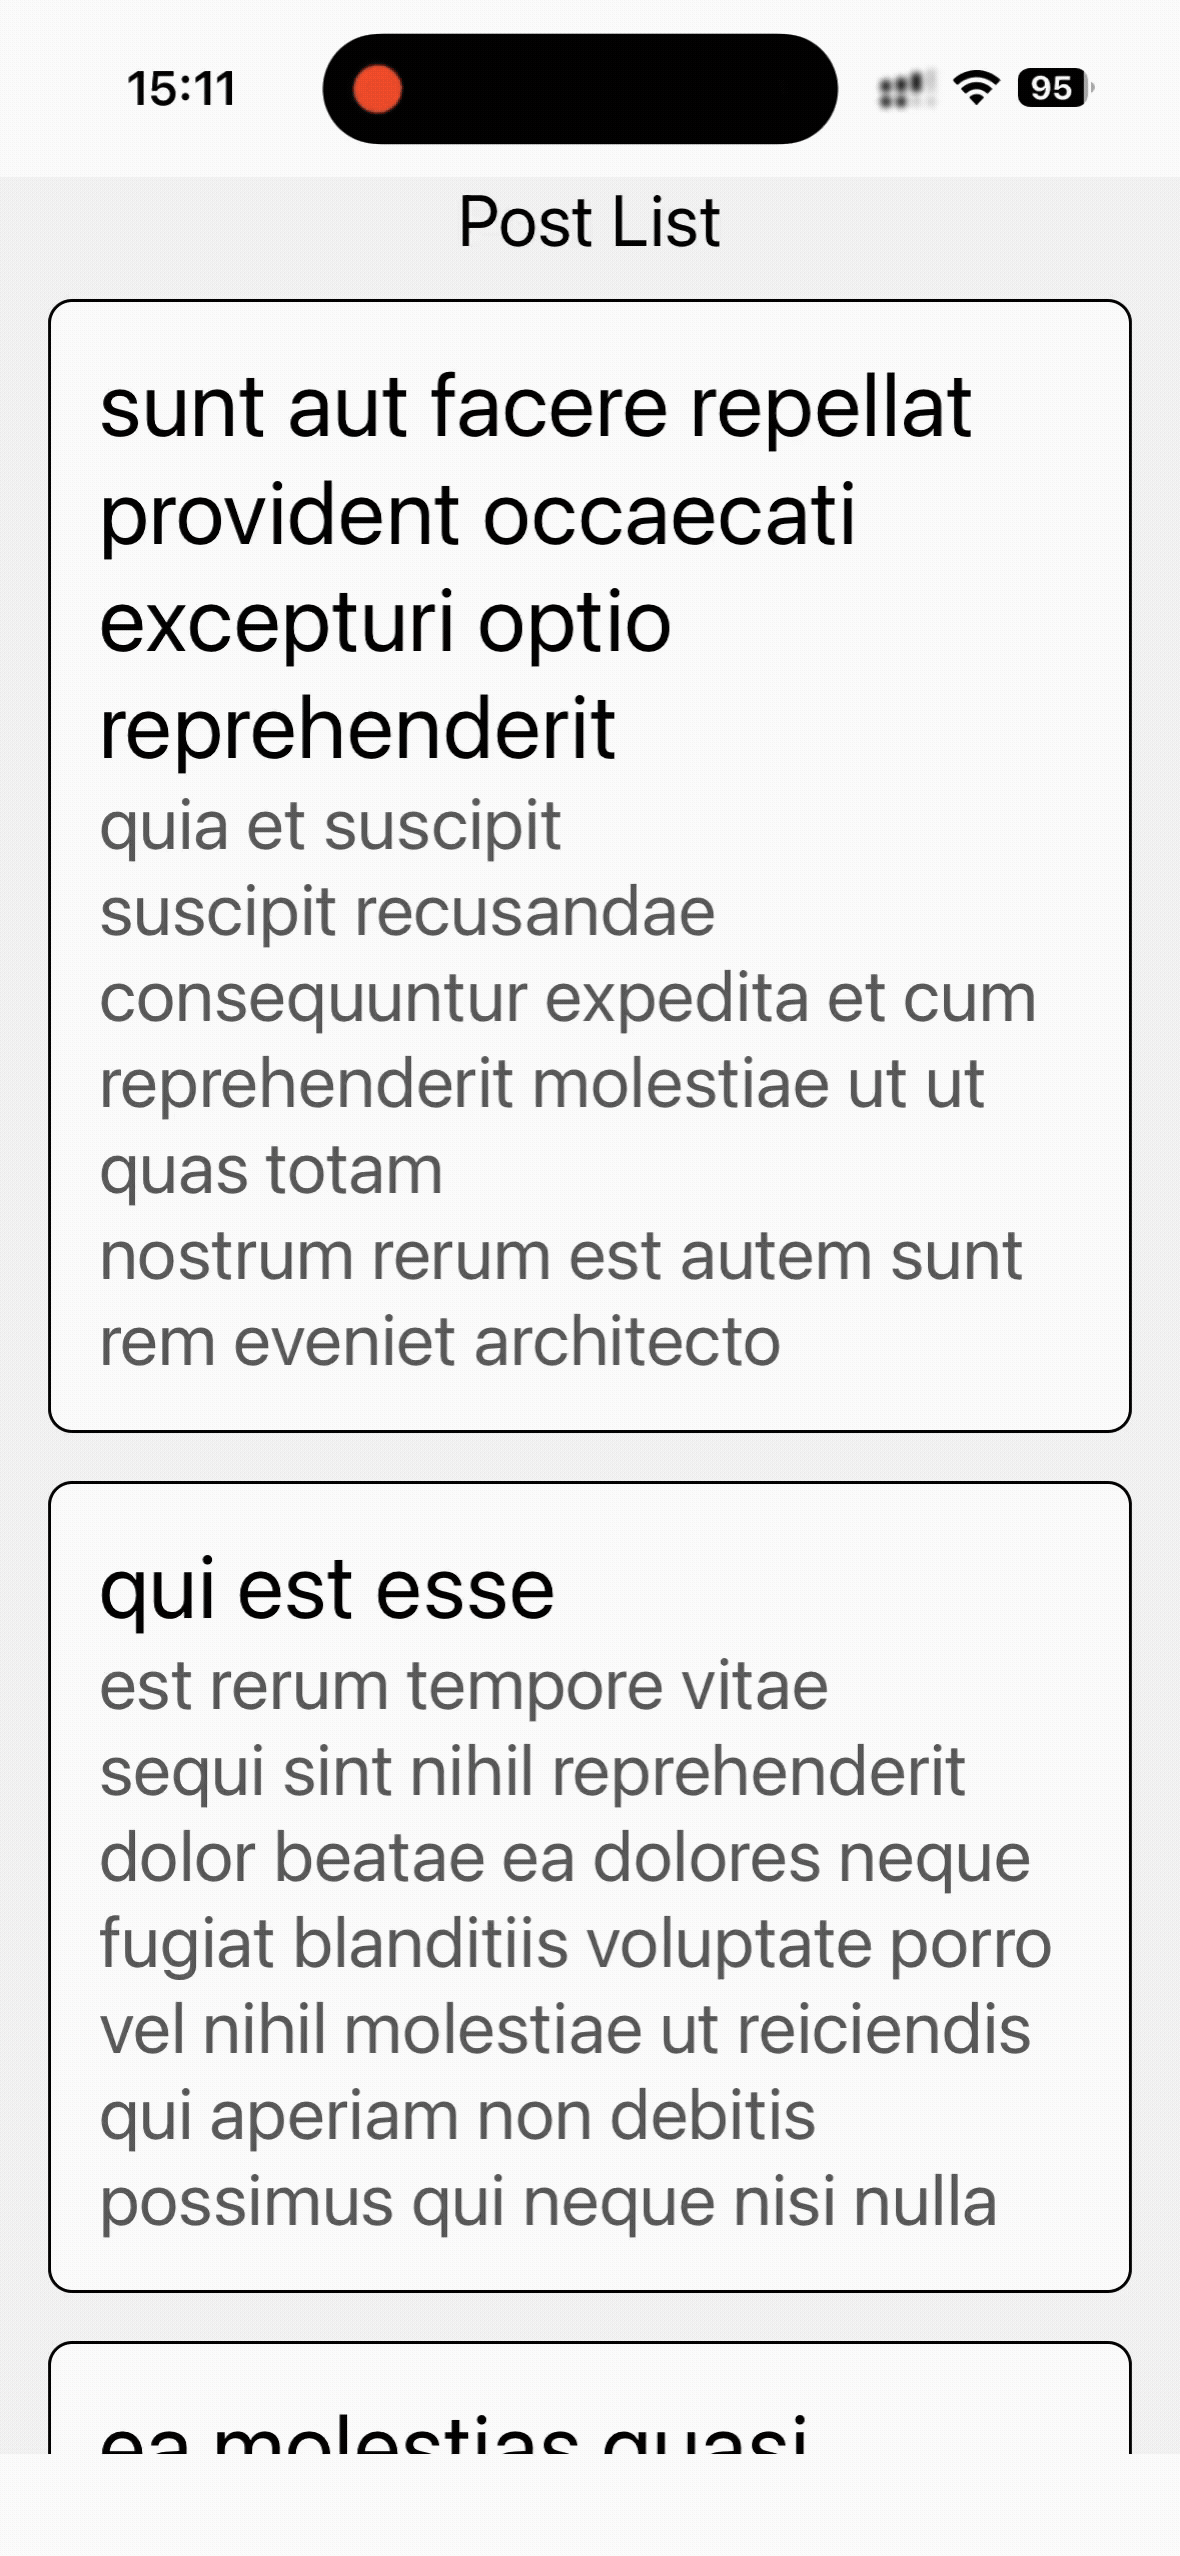
69 - Pull to Refresh
这节课学习下拉刷新,在下拉的时候增加页数,获取到的数据添加到数组头部。
实现下拉刷新主要依赖于 FlatList 的两个核心属性:
refreshing: 一个布尔值,用于告诉FlatList当前是否正在刷新中,如果为true,会显示一个加载指示器的效果。onRefresh: 一个函数,当用户下拉列表时会被调用,用于触发数据加载逻辑,这个函数才是重点。
xxxxxxxxxx1211// app/index.tsx23import { useEffect, useState } from "react";4import { Text, View, StatusBar, StyleSheet, FlatList, ActivityIndicator } from "react-native";56export default function Index() {7 const [postList, setPostList] = useState<{ id: string; title: string; body: string }[]>([]);8 const [isLoading, setIsLoading] = useState(true);9 const [refreshing, setRefreshing] = useState(false);10 const [page, setPage] = useState(1);11 const [total, setTotal] = useState(0);1213 const fetchData = async (currentPage: number = 1, limit = 10) => {14 await new Promise((resolve) => setTimeout(resolve, 1000));15 // 最新版本的json server,使用_page代替_limit16 const response = await fetch(17 `http://192.168.31.180:4000/posts?_page=${currentPage}&_per_page=${limit}`18 );19 const data = await response.json();20 setTotal(data.pages);21 console.log(data.data.map((c) => c.id));22 setPostList((prevState) => [data.data, prevState]);23 setIsLoading(false);24 };2526 // 下拉刷新27 const handleRefresh = () => {28 if (refreshing) {29 console.log("正在刷新中,忽略本次下拉触发。");30 return;31 }32 if (page < total) {33 const nextPage = page + 1;34 setPage(nextPage);35 setRefreshing(true);36 fetchData(nextPage);37 setRefreshing(false);38 } else {39 alert("没有更多了");40 setRefreshing(false);41 }42 };4344 useEffect(() => {45 fetchData();46 }, []);4748 if (isLoading)49 return (50 <View style={styles.loadingContainer}>51 <ActivityIndicator size="large" color="0000ff" />52 <Text>Loading...</Text>53 </View>54 );5556 return (57 <View style={styles.container}>58 <View style={styles.listContainer}>59 <FlatList60 data={postList}61 renderItem={({ item }) => {62 return (63 <View key={item.id} style={styles.card}>64 <Text style={styles.titleText}>{item.title}</Text>65 <Text style={styles.bodyText}>{item.body}</Text>66 </View>67 );68 }}69 ItemSeparatorComponent={() => <View style={{ height: 16 }} />}70 ListEmptyComponent={() => <Text>No Posts Found</Text>}71 ListHeaderComponent={() => <Text style={styles.headerText}>Post List</Text>}72 ListFooterComponent={() => <Text style={styles.footerText}>End of list</Text>}73 refreshing={refreshing}74 onRefresh={handleRefresh}75 />76 </View>77 </View>78 );79}8081const styles = StyleSheet.create({82 container: {83 flex: 1,84 backgroundColor: "#f5f5f5",85 paddingTop: StatusBar.currentHeight,86 },87 listContainer: {88 flex: 1,89 paddingHorizontal: 16,90 },91 card: {92 backgroundColor: "white",93 padding: 16,94 borderRadius: 8,95 borderWidth: 1,96 },97 titleText: {98 fontSize: 30,99 },100 bodyText: {101 fontSize: 24,102 color: "#666",103 },104 headerText: {105 fontSize: 24,106 textAlign: "center",107 marginBottom: 12,108 },109 footerText: {110 fontSize: 24,111 textAlign: "center",112 marginTop: 12,113 },114 loadingContainer: {115 flex: 1,116 backgroundColor: "#f5f5f5",117 paddingTop: StatusBar.currentHeight,118 justifyContent: "center",119 alignItems: "center",120 },121});效果:
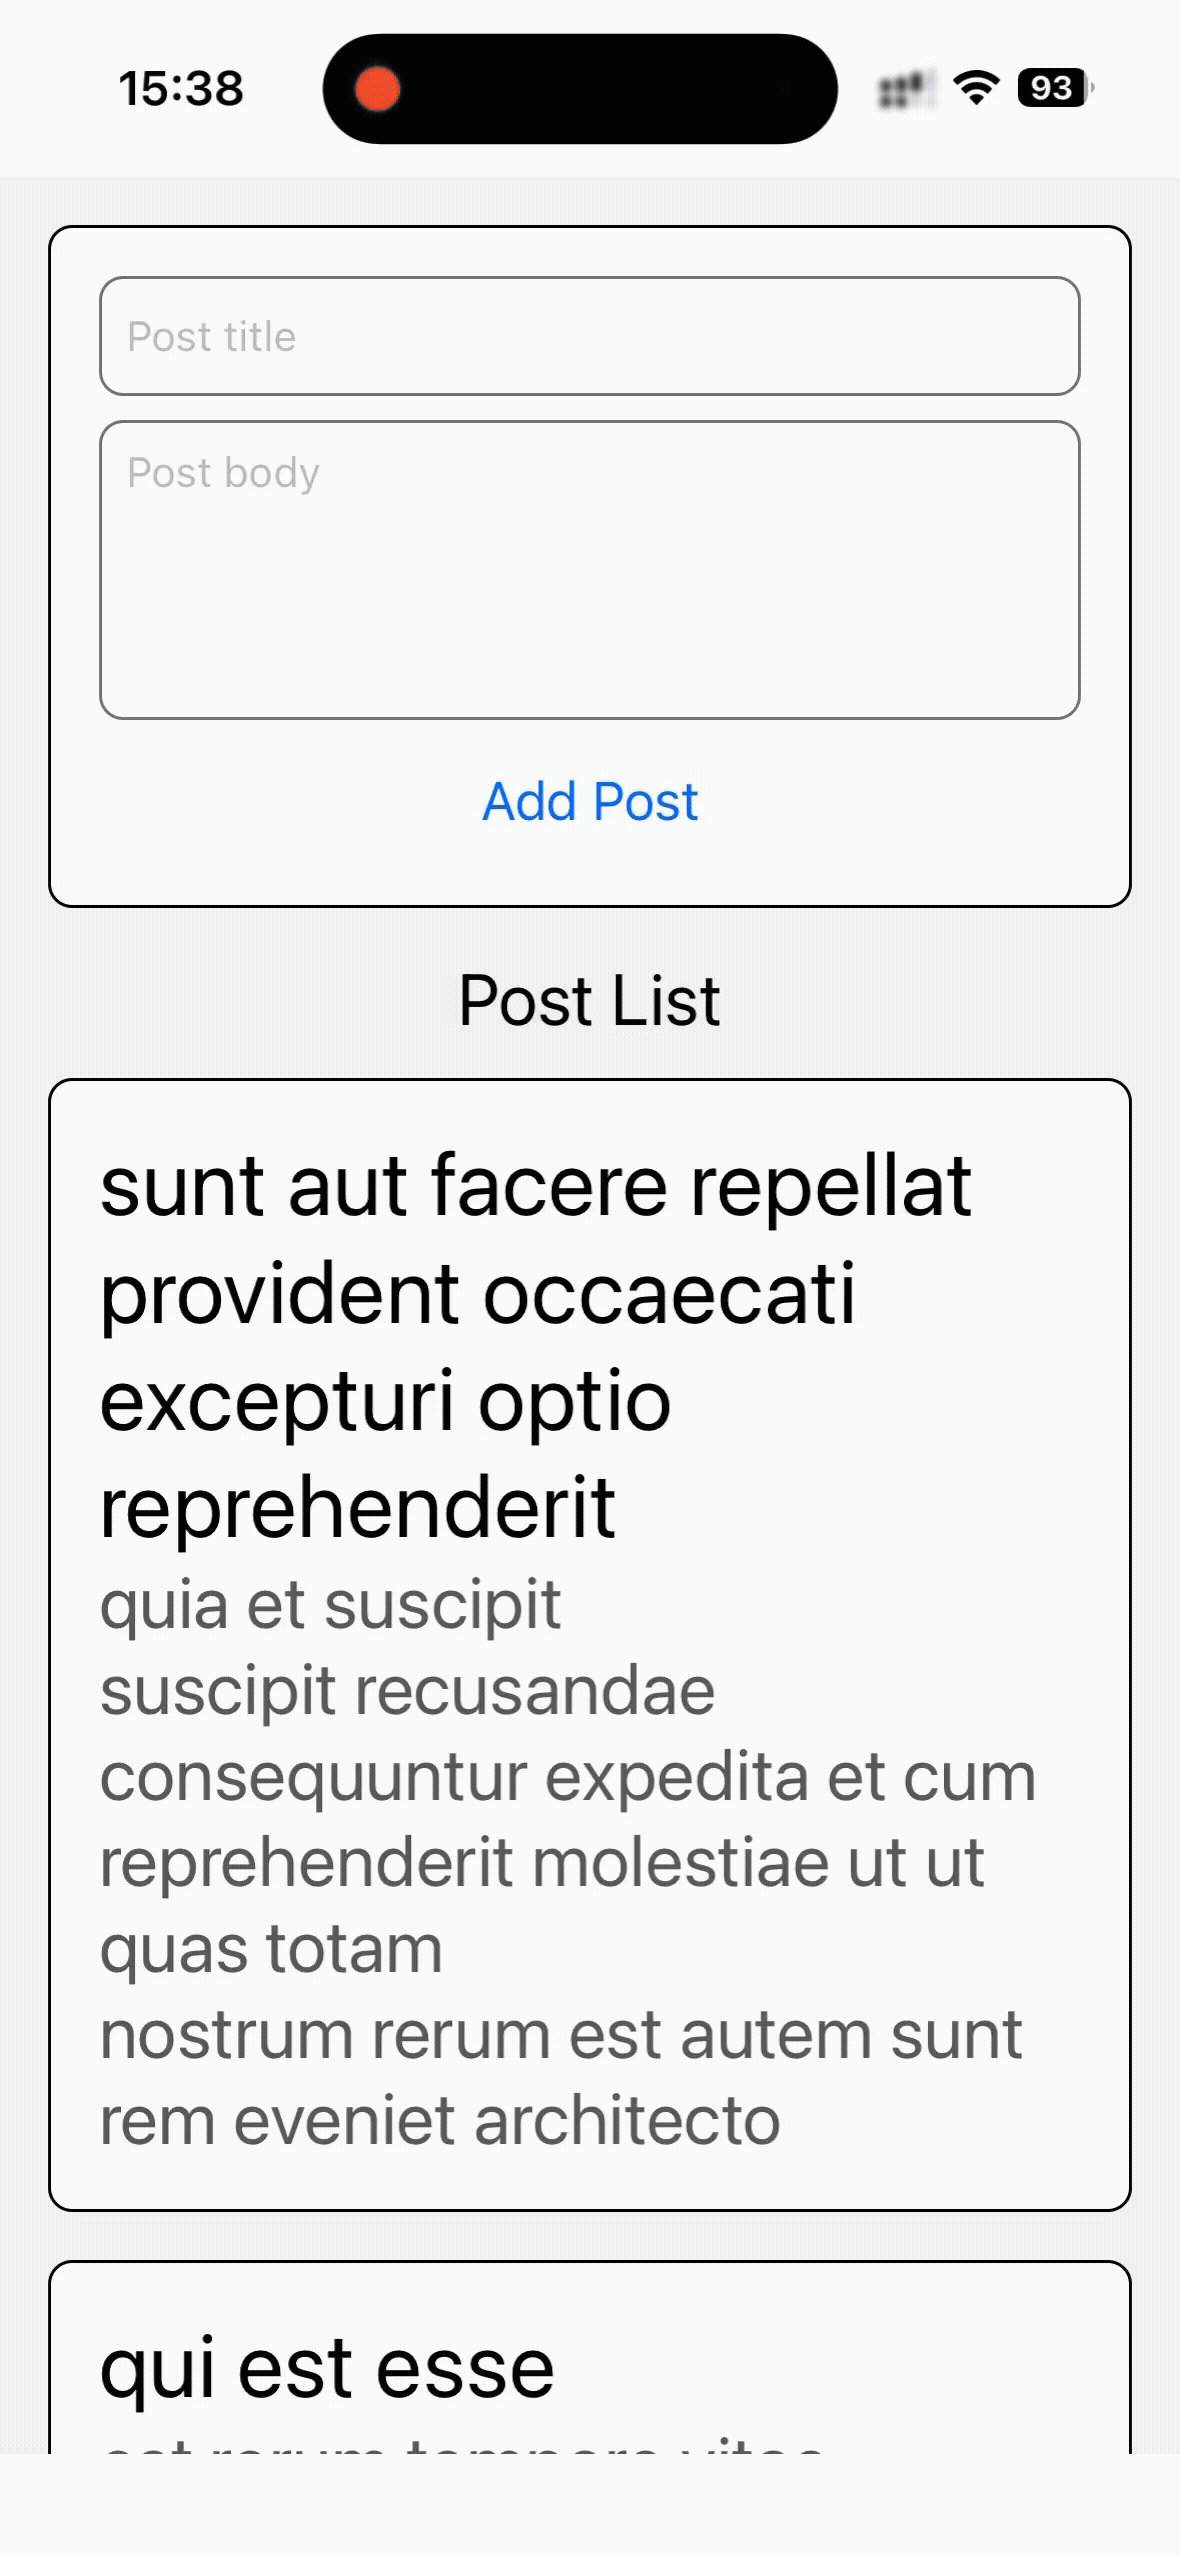
70 - POST Request
这节课来学习新增请求。用之前学习的login form的知识来写,没有什么问题。
xxxxxxxxxx1871// app/index.tsx23import { useEffect, useState } from "react";4import {5 Text,6 View,7 StatusBar,8 StyleSheet,9 FlatList,10 ActivityIndicator,11 TextInput,12 Button,13} from "react-native";1415export default function Index() {16 const [postList, setPostList] = useState<{ id: string; title: string; body: string }[]>([]);17 const [isLoading, setIsLoading] = useState(true);18 const [refreshing, setRefreshing] = useState(false);19 const [page, setPage] = useState(1);20 const [total, setTotal] = useState(0);21 const [postTitle, setPostTitle] = useState("");22 const [postBody, setPostBody] = useState("");23 const [isPosting, setIsPosting] = useState(false);2425 const fetchData = async (currentPage: number = 1, limit = 10) => {26 await new Promise((resolve) => setTimeout(resolve, 1000));27 // 最新版本的json server,使用_page代替_limit28 const response = await fetch(29 `http://192.168.31.180:4000/posts?_page=${currentPage}&_per_page=${limit}`30 );31 const data = await response.json();32 setTotal(data.pages);33 console.log(data.data.map((c) => c.id));34 setPostList((prevState) => [data.data, prevState]);35 setIsLoading(false);36 };3738 const handleRefresh = () => {39 if (refreshing) {40 console.log("正在刷新中,忽略本次下拉触发。");41 return;42 }43 if (page < total) {44 const nextPage = page + 1;45 setPage(nextPage);46 setRefreshing(true);47 fetchData(nextPage);48 setRefreshing(false);49 } else {50 alert("没有更多了");51 setRefreshing(false);52 }53 };5455 const addPost = async () => {56 setIsPosting(true);57 await new Promise((resolve) => setTimeout(resolve, 1000));58 const response = await fetch("http://192.168.31.180:4000/posts", {59 method: "post",60 headers: {61 "Content-Type": "application/json",62 },63 body: JSON.stringify({64 title: postTitle,65 body: postBody,66 }),67 });6869 const newPost = await response.json();70 setPostList([newPost, postList]);71 setPostTitle("");72 setPostBody("");73 setIsPosting(false);74 };7576 useEffect(() => {77 fetchData();78 }, []);7980 if (isLoading)81 return (82 <View style={styles.loadingContainer}>83 <ActivityIndicator size="large" color="0000ff" />84 <Text>Loading...</Text>85 </View>86 );8788 return (89 <View style={styles.container}>90 <View style={styles.inputContainer}>91 <TextInput92 style={[styles.input, { height: 40 }]}93 placeholder="Post title"94 value={postTitle}95 onChangeText={setPostTitle}96 />97 <TextInput98 style={[styles.input, { minHeight: 100 }]}99 placeholder="Post body"100 value={postBody}101 onChangeText={setPostBody}102 multiline103 />104 <Button105 title={isPosting ? "Adding..." : "Add Post"}106 onPress={addPost}107 disabled={isPosting}108 />109 </View>110 <View style={styles.listContainer}>111 <FlatList112 data={postList}113 renderItem={({ item }) => {114 return (115 <View key={item.id} style={styles.card}>116 <Text style={styles.titleText}>{item.title}</Text>117 <Text style={styles.bodyText}>{item.body}</Text>118 </View>119 );120 }}121 ItemSeparatorComponent={() => <View style={{ height: 16 }} />}122 ListEmptyComponent={() => <Text>No Posts Found</Text>}123 ListHeaderComponent={() => <Text style={styles.headerText}>Post List</Text>}124 ListFooterComponent={() => <Text style={styles.footerText}>End of list</Text>}125 refreshing={refreshing}126 onRefresh={handleRefresh}127 />128 </View>129 </View>130 );131}132133const styles = StyleSheet.create({134 container: {135 flex: 1,136 backgroundColor: "#f5f5f5",137 paddingTop: StatusBar.currentHeight,138 },139 listContainer: {140 flex: 1,141 paddingHorizontal: 16,142 },143 card: {144 backgroundColor: "white",145 padding: 16,146 borderRadius: 8,147 borderWidth: 1,148 },149 titleText: {150 fontSize: 30,151 },152 bodyText: {153 fontSize: 24,154 color: "#666",155 },156 headerText: {157 fontSize: 24,158 textAlign: "center",159 marginBottom: 12,160 },161 footerText: {162 fontSize: 24,163 textAlign: "center",164 marginTop: 12,165 },166 loadingContainer: {167 flex: 1,168 backgroundColor: "#f5f5f5",169 paddingTop: StatusBar.currentHeight,170 justifyContent: "center",171 alignItems: "center",172 },173 inputContainer: {174 backgroundColor: "white",175 padding: 16,176 borderRadius: 8,177 borderWidth: 1,178 margin: 16,179 },180 input: {181 borderColor: "gray",182 borderWidth: 1,183 marginBottom: 8,184 padding: 8,185 borderRadius: 8,186 },187});效果:
71 - Error Handling
错误处理我会,就是加一个error状态,老师是使用这个error状态直接整个页面给替换了,我感觉不是很好,所以查了以下,可以按照下面的最佳实践来做。
| 场景 | 推荐方法 | 提示 |
|---|---|---|
| 操作失败 (非列表) | Toast 消息 | 自动消失,对用户干扰最小。 |
| 列表首次加载失败 | 全屏错误覆盖(带重试按钮) | 确保用户看到错误并引导他们操作。 |
| 下拉刷新/滚动加载失败 | 列表头部/底部展示错误(不隐藏内容) | 允许用户查看已加载的数据,并在局部区域提示错误。 |
列表首次加载失败,可以这样显示错误信息,要加一个try again的按钮,方便用户重新查看。

下拉刷新的错误信息显示,估计是在列表顶部加一行,然后里面有错误信息,还有try again的按钮。